BatViewer
Overview
BatViewer is a CDMSBats package that calls on ROOT to display raw data. BatViewer opens up an interactive TCanvas to display a single raw data file or a series raw data folder. Within this interactive TCanvas, we can gain information about triggering, noise monitoring, which detector an event is taking place in, etc.
Set up
Since BatViewer is a CDMSBats package, then the set-up for CDMSBats covers BatViewer. If you have used other CDMSBats packages (i.e., BatNoise and BatRoot), then it is likely you are ready to use BatViewer. We will go through the set-up instructions for BatViewer, but if you would like to see the installation and compilation instructions for CDMSBats, then they can be found here.
In the following "Running" section, we will assume that you have gone through the set-up tutorial.
BatViewer not only uses CDMSBats but also relies on the BatCommon and IOLibrary packages. We will be going over how to install and compile these dependencies as well. CDMSBats, BatCommon and IOLibrary can all be found on GitLab under the SuperCDMS project. To clone these packages, you must have a GitLab account with access to the SuperCDMS project. It is recommended that you work from an ssh session on a computing site (i.e. Cedar or Niagra), however, you can still work locally.
CDMSBats and BatViewer also depend on other packages, those being ROOT and cmake (in particular cmake3). If you are working on a computing site, you may be able to load these as a module. If you are working locally, you will have to install these packages as well. You also have to create an environment variable called "ROOTSYS" that points to ROOT with:
export ROOTSYS=<path_to_ROOT>
BatViewer depends on particular environment variables. You should make sure you set the following variables to compile and run BatViewer:
- ROOTSYS
- PATH
- LD_LIBRARY_PATH
On Confluence, there are multiple resources and examples of how you can set up environment variables and compile CDMSBats depending on the platform you are working on. These resources can be found here.
It is important to note that the latest version of BatViewer does not support/visualize Soudan data. Soudan data is too old to be supported on the newer versions of BatViewer. You may be able to visualize Soudan data on older versions of BatViewer.
It is highly recommended that you set up SSH keys to clone repositories. Instructions on how to create SSH keys can be found here. After you have created your SSH key, then you can begin the cloning process.
IOLibrary
We will start by cloning IOLibrary with the following command (if you have SSH keys set up):
$ git clone git@gitlab.com:supercdms/DAQ/IOLibrary.git
After cloning the IOLibrary repository, we enter its directory and compile it with the 'make' function. After we have complied, we can define the following environment variables:
export CDMS_IOLIBRARY=<path_to_IOLibrary_git_repository>
export LD_LIBRARY_PATH=$CDMS_IOLIBRARY/lib:$LD_LIBRARY_PATH
BatCommon
Next, we will clone the BatCommon repository. You may want to make a directory for Batcommon to avoid clutter. We can use the following command to clone BatCommon:
$ git clone git@gitlab.com:supercdms/Reconstruction/cdmsbats.git
Afterwards, we will create two directories named "build" and "install" in parallel to the BatCommon repository with:
$ mkdir build install
Then cd into the build directory and configure with:
$ cmake ../BatCommon.git -DCMAKE_INSTALL_PREFIX=../install
Now we must install and compile with:
$ cmake --build .
$ cmake --build . --target install
CDMSBats
Finally, we will clone the CDMSBats repository, and again you may want to make a directory for CDMSBats to avoid clutter. We will execute very similar steps to installing and compiling BatCommon. We can use the following command to clone CDMSBats:
$ git clone git@gitlab.com:supercdms/Reconstruction/BatCommon.git
Afterwards, we will create two directories named "build" and "install" in parallel to the CDMSBats repository with:
$ mkdir build install
Then cd into the build directory and configure with:
$ cmake ../cdmsbats.git -DCMAKE_INSTALL_PREFIX=../install
Now we must install and compile with:
$ cmake --build .
$ cmake --build . --target install
Lastly, we can define the environment variable called "Path" which is the path to the CDMSBats install directory:
$ export PATH=<path_to_CDMSBats_install>/bin:$PATH
Running
Once you have taken the proper preparatory steps above and CDMSBats is complied, then we can use BatViewer! Note, if you are working on cluster from macOS, you will need to first install XQuartz. XQuartz will allow us to run graphical programs (for example, TCanvas) remotely on Linux servers from macOS.
Follow the following instructions to install XQuartz if not already installed on your macOS machine: On your local machine, first make sure that Homebrew is installed by following the instructions on the website. Homebrew is a free package management system that simplifies installing software on macOS.
Then, to install XQuartz using your local Mac's terminal with Homebrew:
brew install --cask xquartz
Next, reboot your Mac:
sudo reboot
Finally, you may ssh into yout cluster with the -X flag
ssh -X user@server-ip
You can now use BatViewer be following the instructions below.
You can run BatViewer with the following syntax:
$ BatViewer </path/to/dataset> <event#>
or
$ BatViewer </path/to/data_series_dir> <event#>
The first option is convenient for using BatViewer to examine a single raw data file. The second option is applicable when you have multiple files for a single raw data series that you would like to inspect.
The first argument is the path to the directory containing the raw data series or the path to the raw data file (can be relative). The second argument is the event number, including the dump. For example, if examining dump 2 and event 0001, then we would put 20001. Note: if you are using the first option to inspect a single raw data file, then you do not have to specify the dump number, see below. BatViewer may take a while for events that are later in the file.
Here is an example:
$ BatViewer /data/R134/raw/01140523_1307/ 20001
or
$ BatViewer /nerodata/R134/raw/01140523_1307/01140523_1307_F0002.mid 1
Console Session
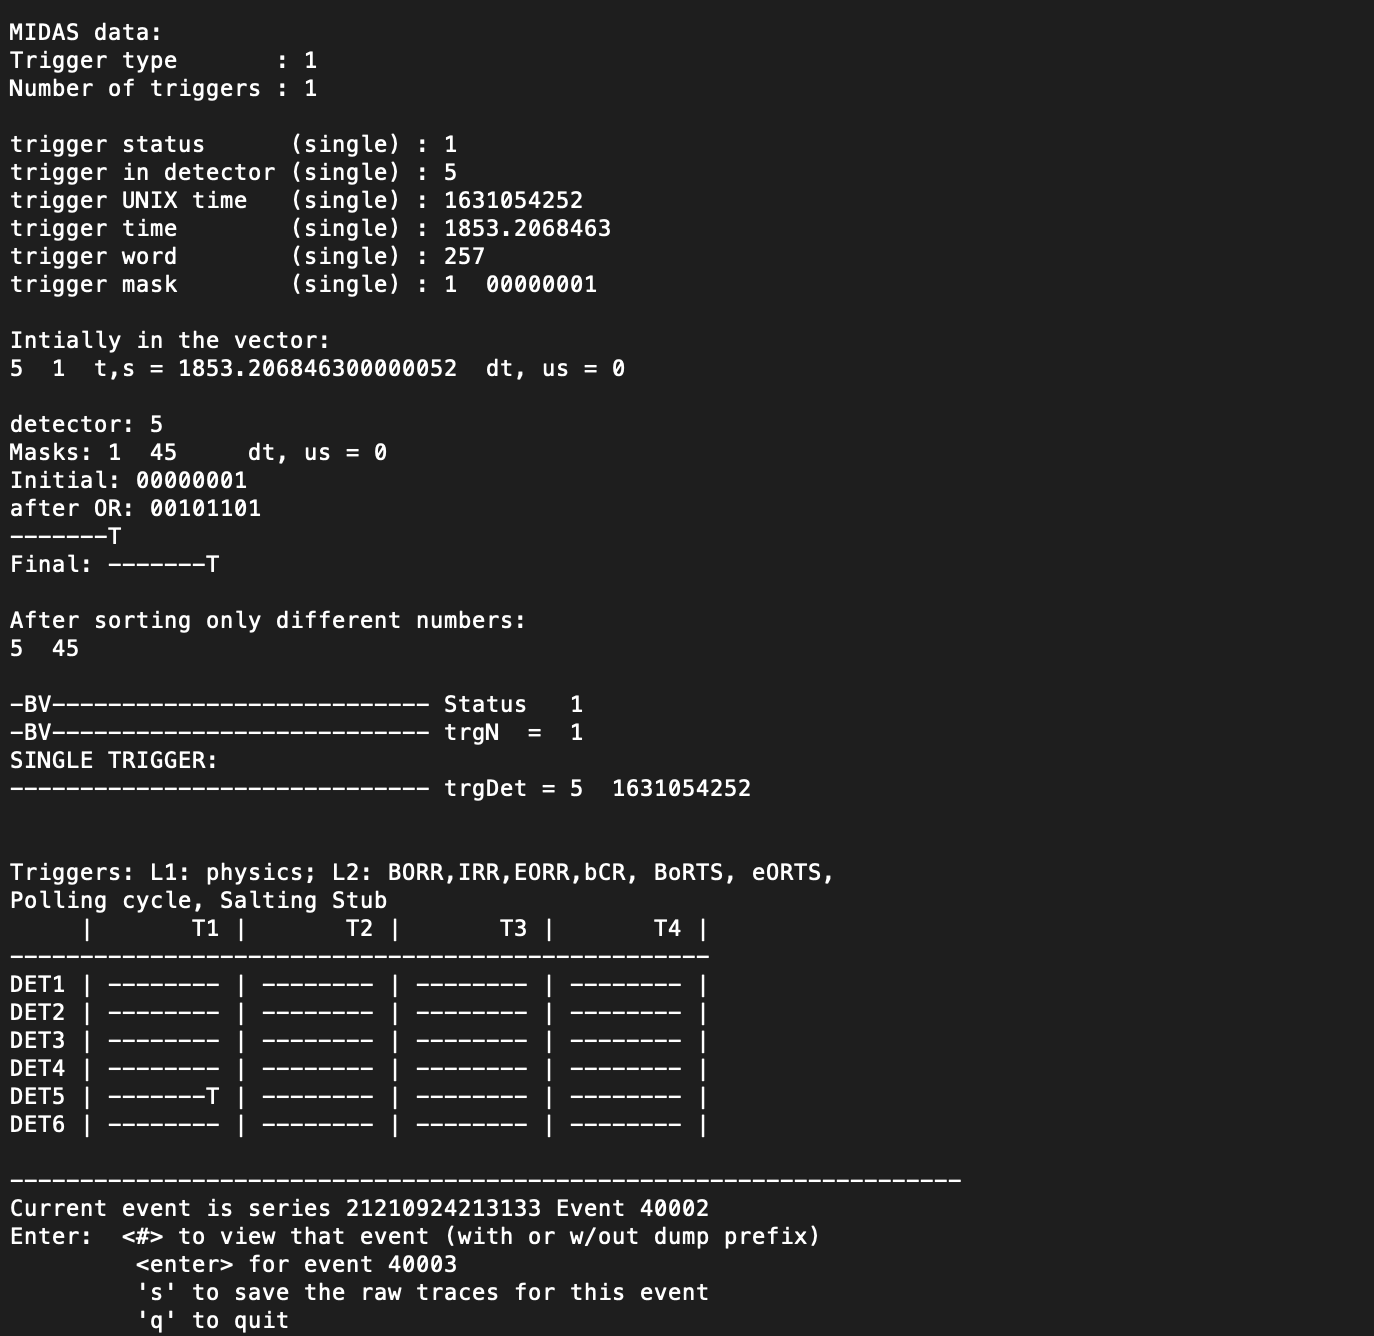
When BatViewer is running, it is very user-friendly. Once it has finished spawning a new window for ROOT's TCanvas, BatViewer will print some information about the raw data to the console session. This information includes (and is not limited to):
- Trigger Type in Event Chosen
- Number of Triggers
- Other Conditional information about the Trigger
- Which Detector the Trigger took place in
It is beneficial to know the different types of triggers when analyzing this data. A short summary of the types of triggers is that Type 1 = physics triggers, Type 2 - 5 = randoms, Type 6 - 7 = test signals, and Type 8 = polling cycle. For reference, you can find a full list of trigger types and other information on triggers here.
Along with this, the user is prompted with multiple actions they can use from the console session. In terminal, the user can control which event to go to next either by giving the event number (by entering the event number you would like to go to) or by going to the succeeding event (by pressing 'enter'). You can save the raw traces (by pressing 's') or you can quit BatViewer (by pressing 'q').
Here is an example of the BatViewer output in the Console session:
ROOT TCanvas
While the information in the console session is very useful, the TCanvas holds the plots of the raw data. The TCanvas displays information like when the dataset was taken, the time since the last event, the event type, the event category and the trigger type.
Also, this is where plots relevant to the particular event and dump are displayed. There are sub-windows to display this information to the user and you can navigate through these sub-windows to your desired plot. You can double-click on any of the sub-windows to pull up a new zoomed-in canvas showing only the sub-pad. If you would like to view the entire zip (showing both phonon and charge), you can double click on the grey bar at the right of that zip's pad. If you want to view the entire phonon or charge pad, you can double click the subplots legend. And finally, to view just a single channel, you can double click on it.
BatViewer displays the sub-windows in order of the number of towers and the number of detectors in each tower. Due to the layout of the detector types, iZIP detectors display phonon and charge channels and HV detectors display phonon channels.
Once the ROOT TCanvas pops up, you can interact with it in all the usual ways (pull up the editor, zoom in, call fits, etc.). If you are unfamiliar with using ROOTs TCanvas controls, you can always reference tutorials online (one that I suggest can be seen here).
Below you can see an image of the BatViewer output on the ROOT TCanvas and the various explanations of the different components:
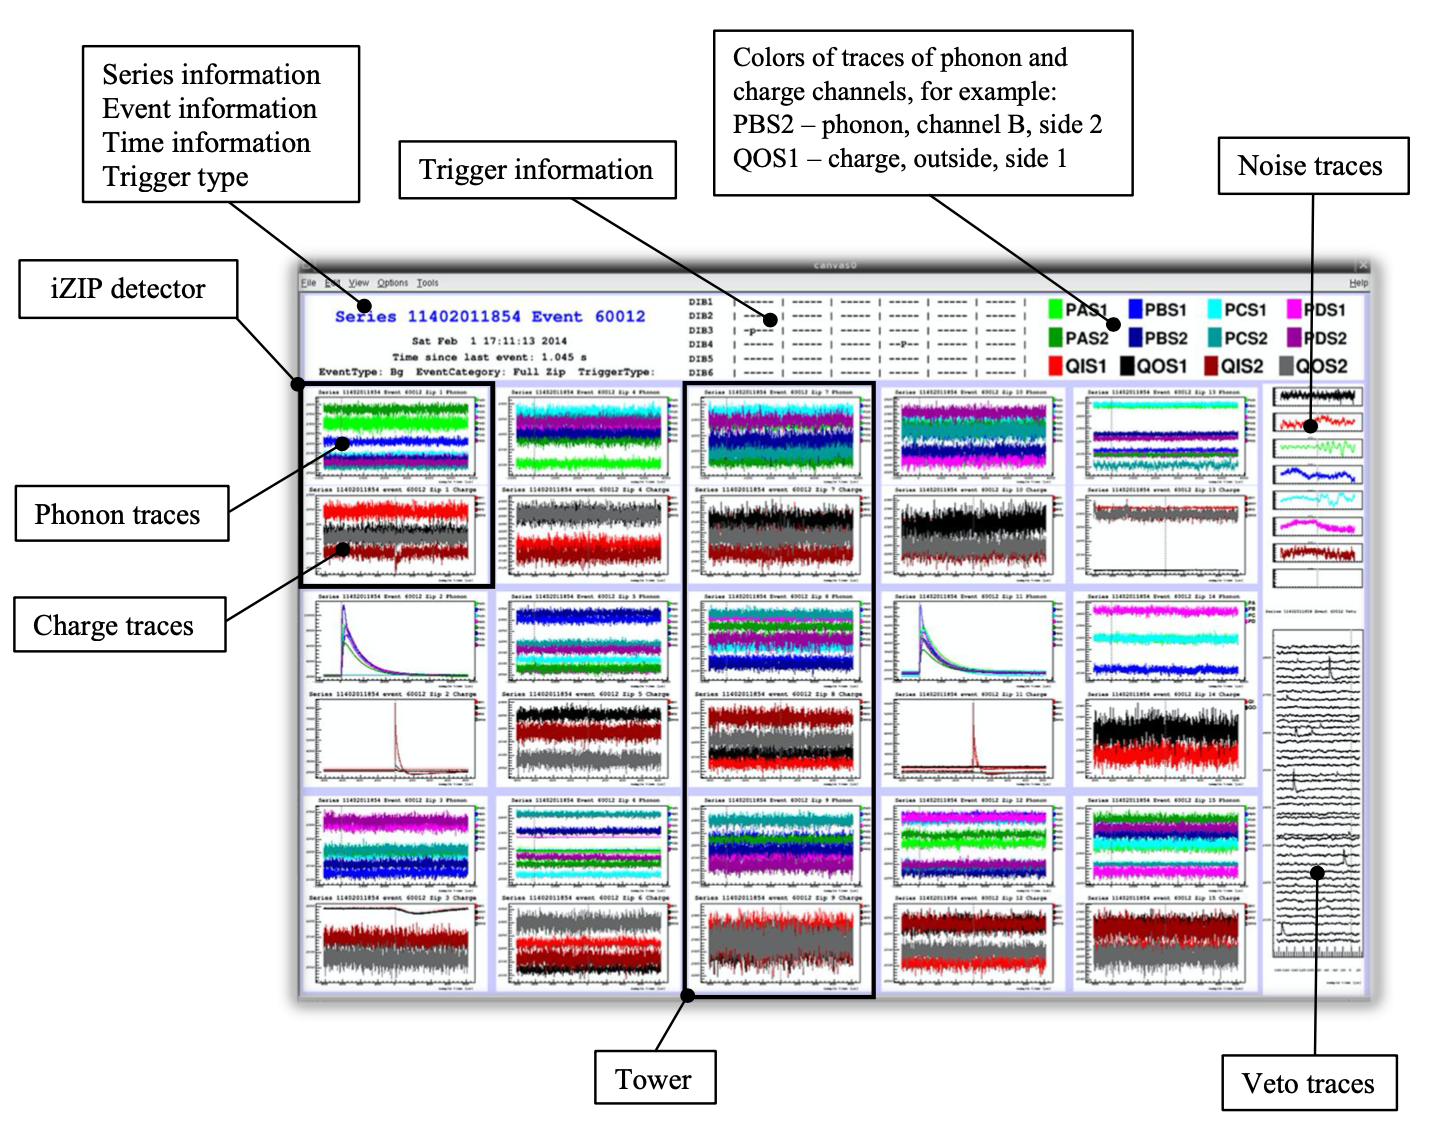
In this BatViewer output, we are visualizing Soudan data which has a detector layout of 5 towers × 3 iZIP detectors. SNOLAB data, which has a detector layout containing 4 towers × 6 iZIP and HV detectors, will not contain Veto traces and Noise traces.