Secure Shell (SSH) for Windows
On this page — |
Important! ssh1 is no longer supported at SLAC;
you must use a terminal emulator that supports ssh2.
The tools described in this section work well together to
provide convenient access to SLAC Unix from Windows machines. Using these tools, it is possible to log in to
kerberos once each morning using your unix username and password, and then use that token for access to AFS, ssh,
cvs and scp for the remainder of the day.
Single Sign-on at SLAC
For Windows Machines. SSH2 with kerberos5 ticket forwarding allows access to AFS on SLAC unix machines.
EXPORT LAW WARNINGS:
- Export of MIT Kerberos software from the United States of America may be subject to the Export Administration Regulations of the United States Department of Commerce, currently (October 2003) codified as Title 15 CFR Parts 730-774.
- You are responsible for complying with all applicable export regulations, including obtaining an export license if required.
- You may not download this software if you are located in, or are a citizen or national of, any country for which the US government prohibits the export of encryption source code, currently (October 2003) Cuba, Iran, Iraq, Libya, North Korea, Sudan, or Syria. (15 CFR Sections 734(b)(3), 740.13(e)(4))
Kerberos Setup
- Download the MSI Installer for M.I.T.'s kerberos for Windows.
- Launch the Installer.
- Select Typical Installation.
- The software will be installed in C:\Program Files\MIT\Kerberos.
Note: There should now be a new icon in your Windows taskbar for the Kerberos Network Identity Manager.
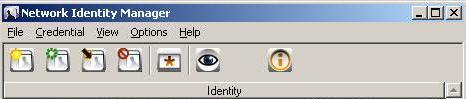
Logging in to Kerberos
- To launch the Network Identity Manager, click on the icon in the taskbar (or go to C:\Program Files\MIT\Kerberos\bin and click on the netidmgr.exe).
 Click on the new credentials icon.
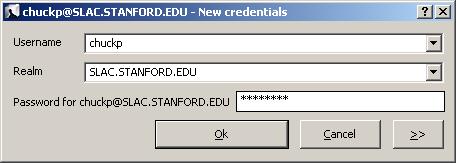
Enter Username, Realm (in UPPERCASE!), and Password, then click OK.
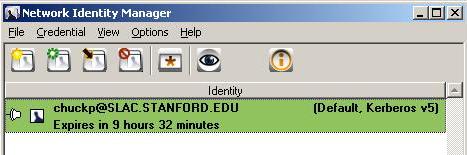
- Be sure the Default is selected as shown below:
PuTTY
- Download PuTTy (0.58 with GSSAPI extensions) and unzip to:
C:\Program Files\PuTTY-GSSAPI
Tip: Make a note of this path (C:\Program Files\PuTTY-GSSAPI) and be sure to use it as you configure PuTTY. (This path has been changed since the original instructions were posted to the web in order to be consistent with other sources of information that have been made available for discussion.)
Important! If you experience login problems (crashes) when trying to use NetIdMgr to automatically get the Kerberos ticket, please send an email to helpsoft@glast.stanford.edu. Be sure to reference this page when doing so. |
- To configure putty, go to:
C:\Program Files\PuTTY-GSSAPI
and double-click on:
putty.exe
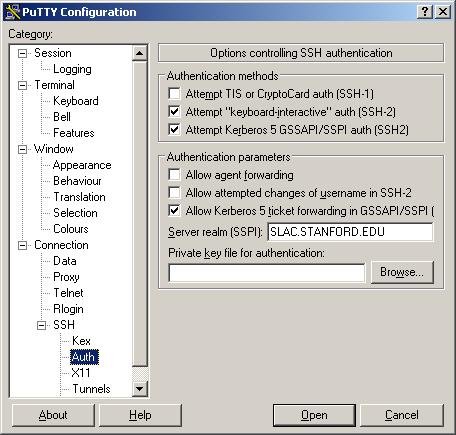
- In the Category pane, click on: Connection --> SSH --> Auth to access the "Options controlling SSH authentication" pane and:
- In the Authentication methods, select:
Attempt "keyboard-interactive" auth (SSH-2)
Attempt Kerberos 5 GSSAPI/SSPI auth (SSH-2)
- In Authentication parameters, select:
Allow Kerberos 5 ticket forwarding in GSSAPI/SSF
then enter Server realm: SLAC.STANFORD.EDU (in UPPERCASE!)
Note: Server realm is not required if using
version putty-0.59-with-gssapi.
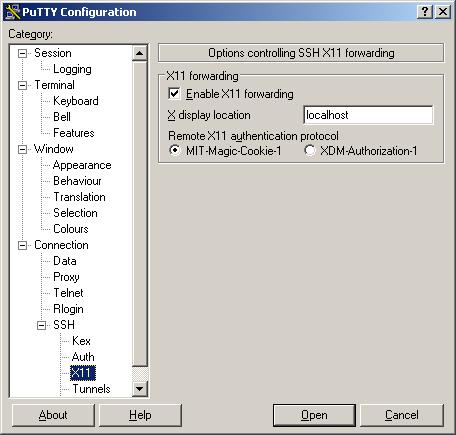
- In the Category pane, click on: Connection --> SSH -->X11 to access the PuTTY Configuration pane.
Select the X11 options as shown below, and be sure the X display location is localhost:
- In the Category pane, click on: Connection --> Data to access the
"Data to send to the server" pane and enter your "Auto-login username":

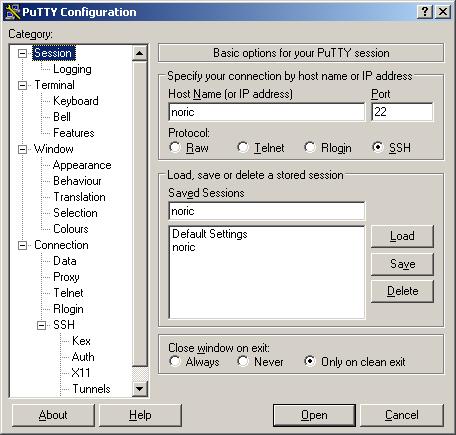
- In the Category pane, click on: Session to access the "Basic options for your PuTTY session" pane and:
- Enter: Host Name (or IP address).
Note: In some cases, you may have to specify a host name representing only the known hosts file, e.g., noric; in others, you may have to specify the complete name, e.g., centaurusa.slac.stanford.edu, which is necessary for accessing CVS. (See TortoiseCVS, step 6, regarding how to set up a PuTTY session.)
- If you wish to save the settings for this session, enter the session name (e.g., noric), then click on the Save button.
- Click on the Open button.
Note: If you save the settings for a session, the next time you want to set up the same session, you simply access the "Basic options..." pane, click on the saved session name, then click on the Open button.
Tip: If you wish to review the settings for a saved session before opening it, click on the saved session name, then click on the Load button.
Remember, by logging in to Kerberos once each morning with your unix username and password, you can then use that token for access to AFS, ssh, and cvs and scp for the remainder of the day. Troubleshooting Tips:
|
Line Mode CVS and MRvcmt
- Using your editor, create the following file:
@echo off
"c:\Program Files\PuTTy-GSSAPI\plink.exe" -g -l userName -2 -batch %*%
- Create the following environment variable:
CVS_RSH c:\Program Files\Putty-GSSAPI\cvs-ssh.cmd
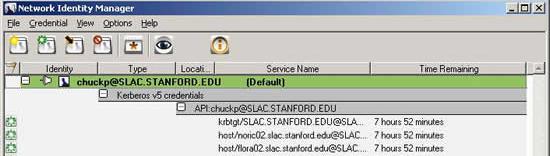
Select View --> Advanced to view the credentials. Below is a screenshot with a set of native Windows credentials and additional Kerberos credentials obtained via MIT's KfW shown in Network Identity Manager. Note that the Unix Kerberos credentials are the default credentials.
Confluence Forum
If you are experiencing unusual problems with your installation, and you have:
- again launched Kerberos Network Identification Manager and obtained a new credential, then
- used PuTTY to access the SLAC facility you are experiencing difficulties with,
please check the "Switching to SSH2 on Windows" page which has been set up in Confluence.
End of SSH Install procedure.
WinSCP (Recommended)
You can download and install the free, open source, WinSCP [4.0.5 (or higher)] FTP/SFTP client, from the WinSCP website.
Important! Some 4.1.* versions of WinSCP were found not to work with the MIT Kerberos login; versions 4.0.5, 4.0.6, and 4.0.7 did work; however, it is now recommended that you use version 4.2.8, or above; version 4.2.8 is documented below.
Note: The following procedure assumes that you have already set up Kerberos, and logged in for the day. If you have not logged in, see Logging in to Kerberos.
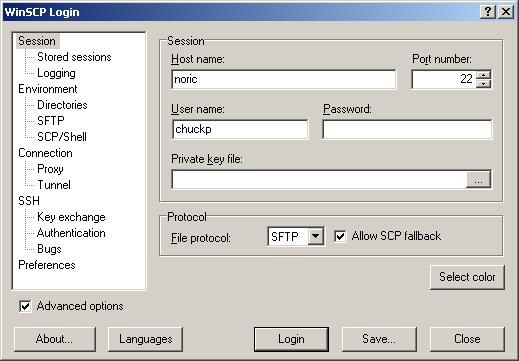
- To set up an SFTP session, launch WinSCP.
The following GUI will be displayed (defaults to the Session Pane):
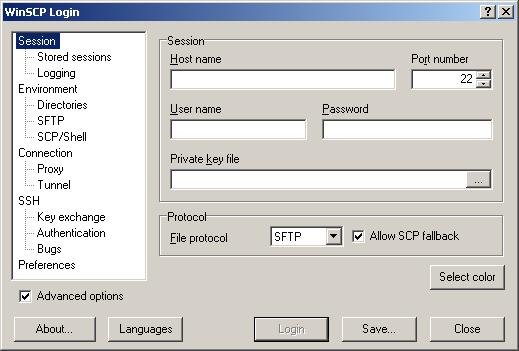
- Be sure that Advanced options is selected.
- Enter the Host name (e.g., noric) and your User name.
Note: Do not enter your password.
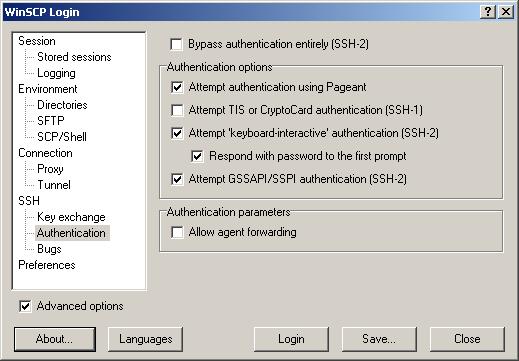
- In the left pane, click on Authentication.
The Authentication pane will be displayed; select options shown below for
Version 4.2.8 and above:
- Click on the Save button.
The following GUI will be displayed:
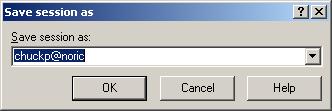
- Enter session name and click Okay.
- Click on the Login button.
The following GUI will be displayed:
Note: If you are prompted for a password, you may not have logged in for the day; see Logging in to Kerberos.
Note: The split-screen GUI is divided into a local and remote view with navigation provided for each. Files and/or folders can be copied in either direction using the "drag and drop" technique.

Owned by: Tony Johnson
| Last updated by: Chuck Patterson 03/03/2011 |