This page summarizes the required software configuration needed to run Aida services on an NT host.
Objective: To create a simple, reproducible, configuration specification for all AIDA hosts, and use scripts to do the configuration and enforce consistency.
A number of 3rd party tools are used. To help all developers stay in synch with versioning, the reference versions of some of these tools are kept in the aida tools afs space, at /afs/slac.stanford.edu/package/aida/tool. Each tool is in its own subdirectory under aida/tool, and is accompanied by our own README file. If you add a tool, please create a new README.TXT file from the template in aida/tool/README_SKEL.TXT.
The Orbacus tools for NT and Unix are kept on the shared AFS file system . If you are going to maintain one of those tools, it is important to understand the AIDA AFS Directory Structure.
This section outlines what software has to be loaded onto each type of Aida host (CORBA system service, hosting an Aida service such as “magnet”, or hosting a development environment) :
| Host Type/Software | Development | IMR | Event | Name |
| AFS Client |
x |
x | x | x |
| CVS Client | x | |||
| Oracle | x | x | ||
| Java J2SE | x | x | x | |
| ORBACUS for Java | x | x | ||
| ORBACUS C++ | x | x(1) | ||
| Microsoft Visual Studio and nmake | x |
Notes from table above
The host of the IMR needs orbacus for C++ because imr and imradmin are executables. Additionally any from which the IMR is to be administered needs imradmin.exe to be in its PATH. This may require you to build Orbacus C++ on that NT host.
Before you begin you'll need the following (described in Appendix A below):
What you need can be roughly broken down into these packages:
Java, if you're developing in Java
For basic AIDA development you need the Core Middleware Infrastructure (you'll need different parts depending on whether you're developing for Java or C++ or both). For Oracle access development you'll need the Oracle for Windows Client Suite. If you want to develop within an Integrated Development Environment (IDE), some are described below.
ORBACUS requires Jthreads/C++ for multithreaded applications, and both of these must be built with Visual C++ (see above) according to their README files. I don't know if JThreads/C++ must be built to use the ORBACUS for Java binary distribution for multithreaded applications. So for C++ development the sequence of downloading and building is Microsoft Visual C++, JThreads/C++, Orbacus for C++. For Java development its just Java J2SE, Orbacus for Java.
Where
to find it: At Origin www.orbacus.com
PATH changes: None
Jthreads is included with the Orbacus ORB download as of version 4.1 (the next major version beyond 4.0). So, as of that version, you will not need to do a separate download and build for Jthreads as described in this section.
Downloaded this from www.orbacus.com. However Stuffit expander failed to unpack it. Winzip succeeded (Winzip downloaded from cnet.com for free). Once its unpacked it needs to be built. There are 2 important readmes, JTC.1.0.14\jtc\README.WINDOWS and JTC.1.0.14\INSTALL.WINDOWS. These contain important stuff. Notepad does not read these properly, but emacs does. The most important recommendations in READMEs are:
1. Build with Microsoft Visual C++ (strongly recommended)
2. Build Jthreads/C++ with the same compiler option switches as are use on the applications you build with it. Notably /MDd and /GX. See JTC.1.0.14/jtc/README.WINDOWS and JTC.1.0.14/INSTALL.WINDOWS.
3.
Set the Visual C++ Project Settings in applications
which use Jthreads/C++ to the values given in the \jtc\README.WINDOWS file.
You modify the build options by editing /configs/make.rules.mak. I changed it in only one respect. I changed the CXX_RTL variable for the non-DEBUG build to /MDd (rather than /MD) so that the compiler uses the same value regardless of whether it is a DEBUG or non-debug build. This is because the readmes are very clear that all switches must be exactly the same between the build of Jthreads/C++ and the build of any application which uses it, and I thought we would most likely be building applications with /MDd.
Following the instructions in INSTALL.WINDOWS, run the Visual C++ environment variable file VCCARS.BAT (for me in C:\Program Files\Microsoft Visual Studio\VC98\bin\vcvars32.bat) to tell VC++ where the dlls are. Then run makefile from the download directory at DOS prompt:
nmake
/f Makefile.mak. This took 1 hour! Then
nmake /f Makefile.mak install” to copy everything to the appropriate places.
Update the user PATH environment variable for the bin directory (see PATH
above).
It initially failed to build because it could not find mspdb60.dll. I solved this by running the Visual C++ environment variable setting BAT file by hand, VCVARS32.BAT (in DOS, navigated to C:\Program Files\Microsoft Visual Studio\VC98\bin\vcvars32.bat and ran it). After that, compiled and built without errors or warnings! After make, then did the “nmake /f Makefile.mak install” to copy everything to the appropriate places.
Where to find it: iona/orbacus/Prod/win32/distribution/OB_OB-4.0.5**. Origin: www.orbacus.com.
PATH change example: include
Z:\infrastructure\OB-4.0.5\ob\bin in your PATH
Orbacus for C++ kept on the shared AFS file system . If you are going to maintain Orbacus, it is important to understand the AIDA AFS Directory Structure.
**For
the next release (beyond the current 4.0.5), you will find the .zip file here:
iona/orbacus/Prod/distribution/OB-4.1.0 for example (the version number could be
different).
The location listed above under "Where to find it" is just temporary
for OB 4.0.5.
Unpack with Winzip. TheAIDA AFS Directory Structure description tells you where to put things Modify /configs/make.rules.mak for the same reason as for Jthreads/c++ (see above). Following the instructions in INSTALL.WINDOWS, run the Visual C++ environment variable file VCCARS.BAT (for me in C:\Program Files\Microsoft Visual Studio\VC98\bin\vcvars32.bat) to tell VC++ where the dlls are. Then run makefile from the download directory at DOS prompt:
nmake
/f Makefile.mak. This took 3 hours! Then
nmake /f Makefile.mak install to copy everything to the appropriate places.
Update the user PATH environment variable for the bin directory (see PATH
example above).
Note then, for applications using Orbacus and Jthreads/c++, you need to use the following options: /MDd and /GX.
See configs/sh.init for setup for cross-testing c++ and Java orbs.
Where
to find it: iona/orbacus/Prod/win32/distribution/OB_OB-4.0.5**. Origin:
www.orbacus.com
CLASSPATH change example: Add the full pathname of the
OB.jar file created by the install to your CLASSPATH, eg C:\Ooc\lib\OB.jar.
No PATH change necessary.
Orbacus for Java kept on the shared AFS file system . If you are going to maintain Orbacus, it is important to understand the AIDA AFS Directory Structure.
**For
the next release (beyond the current 4.0.5), you will find the .zip file here:
iona/orbacus/Prod/distribution/OB-4.1.0 for example (the version number could be
different).
The location listed above under "Where to find it" is just temporary
for OB 4.0.5..
We are installing pre-built JAR files (not building Orbacus for Java from sources). The above "Where to find it" is a directory that has a file containing the zip file of the binary version (that is, the .jar file). To install it, just unzip it and follow the instruction sin the README contained in the directory that will be created by the unzip. In particular, modify your CLASSPATH to point to OB.jar.
There is also in iona/orbacus/Prod/win32/distribution/OB_OB-4.0.5/ a complete source code distribution. If you want to take that route (which will result in faster executables), copy iona/orbacus/Prod/win32/distribution/OB_OB-4.0.5/JOB-4.0.5.zip to the drive on which you wan to install, unzip it, and follow the instructions in the README. in particular you must do these two (it takes some time - hours)
Nmake
/f Makefile.mak
Nmake /f Makefile.mak install
Where
to find it:
afs/slac/package/aida/tool/java Origin: JDK1.3 from java.sun.com (this took an
hour to download, it only
went at 15Kbytes/s)
PATH change example: include
Z:\infrastructure\jdk1.3.0_02\bin. No specific CLASSPATH change necessary,
but see below for details.
At end of installation process it asks if you want to read the README. Do that because it references the install instructions on the Sun website. This talks you through setting the PATH and CLASSPATH environment variables. Note that jdk 1.3 doesn’t need a CLASSPATH variable to be set, but if it is set, it must include “.”. So, since the Java Thin Client (see below) does need CLASSPATH, make sure that CLASSPATH includes a “.”
George Crane has written a very precise and useful guide for installing the base set of client side tools needed for Oracle development. It is at: x:\applications\supported\oracle\readme.txt. It will install compatible versions of Oracle Installer, SQLNet, SQL*Plus and ODBC. When you have finished, restart your computer, if you don't you won't be able to setup ODBC because it won't be able to find dll files it needs.
Where
to find it: See x:\applications\supported\oracle\readme.txt.
PATH change example: C:\orant\bin;
We have a number of versions of ODBC, each is compatible only with given versions of the other Oracle software. The list of versions which work together, and good instructions for installing Oracle and a compatible ODBC driver, are in x:\applications\supported\oracle\readme.txt.
Having installed ODBC (as part of the Oracle Client Suite installation) get instructions for setting it up for SLAC_TCP data source from its help file (assuming the instructions in x:\applications\supported\oracle\readme.txt have been followed, this is in Programs->Oracle for Windows->ODBC Help File. This will talk you through using the Microsoft ODBC Administrator to create a new System DSN (not User DSN). Start Programs->Oracle on Windows NT->Microsoft ODBC administrator. Click on System DSN tab and enter:
Data
Source Name = SLAC_TCP_MS
TNS Service Name = SLAC_TCP
Test the ODBC setup using the Oracle ODBC 32Bit test application from Start menu->Programs->Oracle for Windows NT. Hit "connect" and enter your Oracle user name and password, and the TNS service (SLAC_TCP). Type an SQL query against the service, and it'll display the result in the window.
Where
to find it: See x:\applications\supported\oracle\readme.txt.
No PATH or CLASSPATH changes.
Before you can use ODBC, Net8 has to be set up. x:\applications\supported\oracle\readme.txt should include instructions to copy the tsnnames.ora file to c:/orant/net80/admin. If that’s been done you don't have to do any more to set up Net8.
Where
to find it: At Origin: http://otn.oracle.com/software. Specifically I downloaded Version 8.0.5.2
JDBC(Thin and OCI) for NT (1.0MB), which can be found under Drivers ->
JDBC. You need a user name a password to download Oracle stuff. I used Bob’s.
CLASSPATH change example: Z:\infrastructure\JDBC\classes111.zip; No PATH
changes.
The download file must be unzipped. The result of the unzip will create one or more zipped java classes. Add the full pathname of the classes***.zip files to your CLASSPATH (create a CLASSPATH if you don’t have one). Don’t forget to include a period (for current directory) in the CLASSPATH, which is required by java jdk 1.3 if a CLASSPATH exists (see above). I set it to .;Z:\infrastructure\Jdbc
Where
to find it: See x:\applications\supported\oracle\readme.txt.
No PATH or CLASSPATH changes, but see below for .login changes on Unix, and
user name/password issues.
Sqlplus
is the main way of entering ad hoc queries and database management
instructions to the Oracle database. That is, SQLPlus lets you enter SQL in a
window and see the results directory, so its good for prototyping and testing
your SQL queries. A version exists for unix and NT. It will
be installed as part of the Oracle Client Suite
(see above).
Documentation
Put the following lines in your .login:
source ~ian/8ienvj
setenv TWO_TASK SLAC_TCP
Then just type $ sqlplus. It will ask for your Oracle user name and password
Install sqlplus from the X drive. See x:\applications\supported\oracle\readme.txt for instructions on the installation. Then run Programs/Oracle for Windows NT/SQL Plus. Give the user name you want to use, password, and SLAC_TCP as the Host String.
You need a username and password for Oracle access, including sqlplus. You can use the NLCDA Oracle account if you like, or NLCDEV. See other members of AIDA team for the passwords. If you want your own account, send mail to db-admin to get privileges to the software on the X disk you need and to get set up.
These are compilers and so on used to develop clients, servers and applications
Where
to find it: Nominally under X:\applications\supported,
but I found I needed the disks from Andrea Chan
PATH changes: Install does this for you.
I had a problem installing this from the X disk. Installer said it couldn’t create a DCOM directory. Got CDs from Adrea Chan and installed them from there. Installed the full MSDN with Visual Studio too.
Compatibility settings: For Jthreads/C++ and Orbacus, use /MDd and /GX compiler switches. Link to jtc.lib (not jtcd, since didn’t compile Jthreads/c++ with DEBUG on), see JTC.1.0.14\jtc\README.WINDOWS and OB-4.0.5\INSTALL.WINDOWS for help with Visual Studio setup for Jthreads/C++ compatibility.
Note, on the Microsoft Visual Studio disk 2 (from which it seems you don’t need to install anything) there is a product described called Microsoft Data Access SDK! It seems to be a metaprotocol for various data sources, ODBC, OLAP, OLE, ActiveX control, etc. Maybe its worth taking a look at.
Where
to find it: nmake is supplied and installed as part of Microsoft Visual
Studio.
PATH changes: If you install Visual Studio the path should be changed for you;
otherwise, nmake may be found in C:\Program Files\Microsoft Visual Studio\VC98\Bin.
Where
to find it: Nominally under X:\applications\supported,
but I found I needed the disks from Andrea Chan
PATH changes: Install does this for you.
CLASSPATH: See Note below.
To develop Aida and applications from within Microsoft J++ you need to set the CLASSPATH variable within Microsoft J++ as well as the regular environment variable. In other words, if the environment variable CLASSPATH, which you have set using the System control panel, Environment tab, is:
.;I:\package\aida;C:\Ooc\lib\OB.jar;Z:\infrastructure\JDBC\classes111.zip;
Then, in Microsoft J++, select the project Properties dialog, off the Project pull down menu, and separate entries under the CLASSPATH tab:
.
I:\package\aida
C:\Ooc\lib\OB.jar
Z:\infrastructure\JDBC\classes111.zip
Where to find it: aida/tool/netbeans. Origin: www.netbeans.org.
There are also various Unix versions, OpenVMS (!) and Mac.
PATH It will try to configure this for you, it just needs to find
the Java JDK. See below for how to set the CLASSPATH that netbeans uses for
building applications.
Once cvs and J2SE are set up, copy the file I:\tool\netbeans\NetBeans-release32.exe over to your C: drive then run the executable from your C: drive. I used the Command Prompt to do this. NetBeans should automatically find your J2SE if you installed it in the standard location.
Cvs integration: NetBeans should automatically find cvs if you set up your Path environment variable correctly to include cvs.
To develop Aida with Netbeans you need to set the CLASSPATH variable within Netbeans as well as the regular environment variable. In other words, if the environment variable CLASSPATH, which you have set using the System control panel, Environment tab, is:
.;I:\package\aida;C:\Ooc\lib\OB.jar;Z:\infrastructure\JDBC\classes111.zip;
Then, in Netbeans, pull down the Project menu, and select the Settings dialog. Select the "Compiler Types" settings, and expand the "external compilation" properties. Select the "expert" tab of the properties window, and edit the classpath property. You can just cut and paste from your CLASSPATH environment variable.
This appendix describes software associated with AIDA development, but not core to it.
Where to find it: On NT, X:\Applications\Supported\AFS\N.N\N.N.NClient\afs.EXE Double click on this file to complete the installation.
N.N and N.N.N are the current release. There will only be one release in that directory since it is in the "Supported" path.
PATH change example: C:\PROGRA~1\IBM\AFS\Client\Program;C:\PROGRA~1\IBM\AFS\Common;
The installation will make this change for you.
You need this because the AIDA package production source code is in afs at afs/slac.stanford.edu/package/aida.
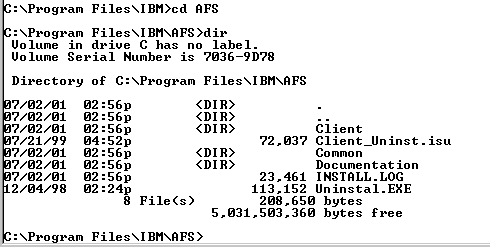
To check whether you have the IBM AFS client software on your NT box look here:

If you don't, contact Jim Knopf x3407. He'll need to get a license from SCS for your use. Then he'll tell you how to set it up from there.
Once you've got the AFS Client installed, start it from the Program menu.
Make sure you have obtained afs tokens, by looking here:
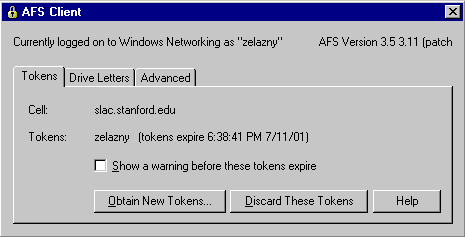
If it says:
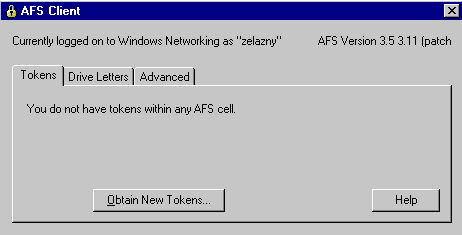
Then push the ![]() button and enter your
username and password, like:
button and enter your
username and password, like:
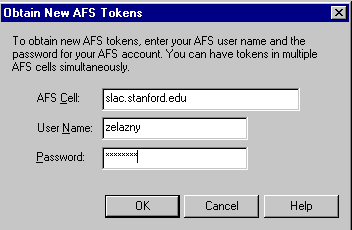
Now you can map a drive to anywhere on afs, most particularly you probably want to map a drive to the slac.stanford.edu cell root, and maybe another to AIDA in particular (AIDA is at afs/slac.stanford.edu/package/aida). One way to map a drive is by using My Computer, using the "Map Networked Drive" toolbar icon. But, the following describes a better way.
To Map an NT drive to AFS:
For a detailed description of AFS installation and mapping, see this Stanford AFS documentation page.
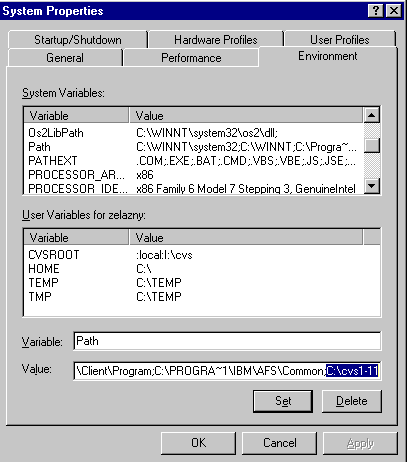
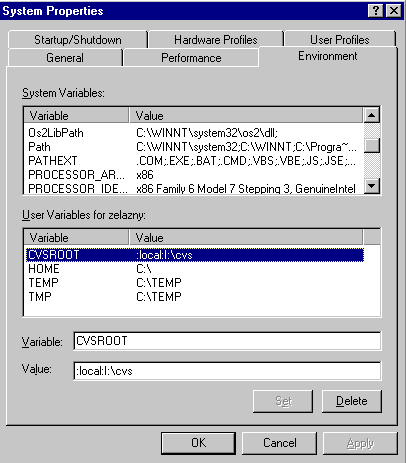
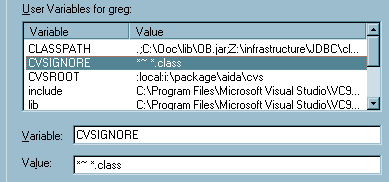
Where to find it: aida\tool\cvs
PATH changes: See below. You also need to set an environment variable
specifically for CVS, called CVSROOT
Once the IBM afs client is set up, you can install cvs on your NT box. Assuming I: is mapped to /afs/slac/package/aida
cvs init
cvs checkout CVSROOT
cvs release CVSROOT
source /afs/.slac.stanford.edu/package/aida/common/script/aidaSetEnv.sh
That's it! Go forward and develop.
**Important** you MUST change CVS administrative files in CVSROOT with the cvs tool itself!
[Aida Home Page][SLAC Controls Software Group][ SLAC Home Page]
Author: Greg
White, 15-Jul-2001
Modified by: Mike Zelazny,
17-Jul-01.