This pages describes the basic Aida development environment on the various operating systems pertinent to Aida.
| CVS commands for Aida Development on NT | NT Basic Development Guidelines |
| NT Basic IDE Development Guidelines | Unix Basic Development Guidelines |
| Alpha/OpenVMS Basic Development Guidelines |
In this example we get all of the aida source files and put them into a new directory we'll call "dev" on our C: drive. These steps will create a directory filesystem under .\edu\stanford\slac\aida\*, which will be populated with all of the files kept under source control in aida\cvs. Note: the aida source code directories contain many files which we do not keep in CVS (the files created by idl compilation in particular), so this will not create a mirror image of what's in package\aida\edu..., it will create a readable image of what's in package\aida\cvs\edu\stanford\slac\aida instead.
If any writing cvs operation fails, make sure your AFS tokens haven't run out.
Then issue the cvs checkout command from the development directory
- the edu directory and all its subdirectories will be created under
the directory from which this command is executed:
C:\dev> cvs checkout edu
- Optionally check the idl out from cvs (if you're going to change them):
C:\dev> cvs checkout idl
Run nmake, to generate the idl output and compile any changes to existing files.
C:\dev\edu\stanford\slac\aida\ca>nmake /F makefile.win32 to just make ca package
The classpath used by all the AIDA servers is defined for all of them in common\script\aidaSetEnvRuntime.bat/.sh. At the time of writing that file defines:
AIDAROOT;
AIDA;
AIDA\tool\win32\orbacus\Ooc\lib\OB.jar;
AIDA\tool\win32\orbacus\Ooc\lib\OBEvent.jar;
AIDA\tool\win32\jdbc\classes111.zip;
AIDAROOT is at the head, so that for development, a different root can be used, where the classloader will look first, before going to the production root AIDA.
At present we use the same classpath for clients as for servers, even though technically clients don't need classes111.zip because they don't use jdbc.
The following describes the basic prerequisites and procedure for building Aida on NT.
You must define an environment variable AIDA on your NT workstation (using the Environment tab in the System control panel), to point to the production AIDA directory on AFS. For instance, if your drive I mapped to all SLAC's AFS space, then verfiying AIDA should read like the following:
C:\> echo %AIDA%
I:\package\aida
The following Win32 examples assume that the classpath has been defined in the CLASSPATH environment variable. The CLASSPATH should be defined to include the current directory (the . at the beginning of the CLASSPATH), followed by the production Aida code root, plus the .JAR files that define all the needed 3rd party packages:
C:\dev>echo %CLASSPATH%
.;I:\package\aida;C:\Ooc\lib\OB.jar;Z:\infrastructure\JDBC\classes111.zip;
The CLASSPATH is so defined because it should point to the directory in which you would find a subdirectory called "edu" (as well as anything else you need in the classpath). This is because the javac compiler resolves references to items by looking in all subdirectories named as each imported package is named, as seen by looking from each directory pointed to by the CLASSPATH.
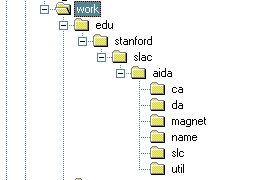
Since Aida is in the package suite edu.stanford.slac.aida.*, the source .java files and bytecode .class files should be kept in subdirectories of the working directory which are correspondingly named ./edu/stanford/slac/aida/da, /edu/stanford/slac/aida/slc, etc.
So, say you have cvs'ed the aida package filesystem to a working directory named "work":

To make a single Aida sub-package in a local working directory: Eg, the ca package, set default to that directory and issue:
C:\work\edu\stanford\slac\aida\ca>nmake /F makefile.win32
To force build all sources in a makefile use /A
C:\work\edu\stanford\slac\aida\ca>nmake /A /F makefile.win32
To make all of Aida in a local filesystem, set working directory to the code root (ie the directory with the the \edu directory in it):
C:\work>nmake /F %AIDA%\common\script\MakefileAida.win32
The following illustrates the syntax of jidl commands for use in Aida. Position yourself at the code root and issue commands such as the following (or use the --output-dir option).

To use the production idl files:
C:\dev>jidl --prefix-package ca edu.slac.stanford.slac.aida I:\package\aida\idl\ca.idl
Positioning yourself in "work", commands of the following form will compile any aida source code (though these examples just compile a single file):
![]()
This section describes setting up development of aida in various IDEs on NT.
Get local copy of Aida source code into Microsoft J++:
Follow the instructions above to check out the source of aida from CVS and run the makefile to build a local copy building all the CORBA files (steps 1 to 5 above)
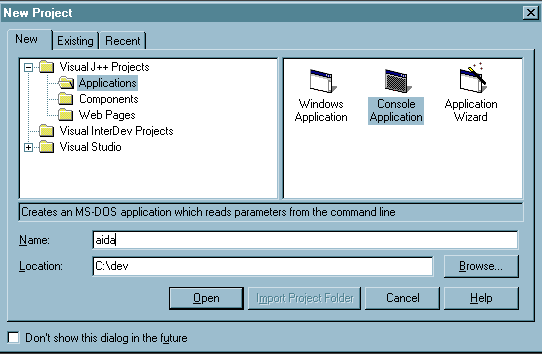
Start Microsoft J++, and create a new project, of the type "Console Application", giving as the directory, the name of the directory immediately above the edu directory you created with the "cvs checkout edu" command (the project name can be whatever you want).

That should result in the creation of a Solution, and Project, already populated with the files checked out from CVS. Having done that you can just build the project, it should all build correctly.
Follow the instructions above to check out the source of aida from CVS and run the makefile to build a local copy building all the CORBA files (steps 1 to 5 above)
Start netbeans. Under the File menu, select Mount Filesystem. Navigate the to the root directory of the filesystem you created when you ran the makefile, ie, go to the directory where there is a edu subdirectory (or a directory above it) and hit "Mount Dir". All of the files under that directory will be automatically recognized by Netbeans. If you want to use CVS within netbeans, don't do the "Mount Filesystem" from the File menu, instead pull down the "Versioning" tab, and select "Mount CVS".
Add txt, idl and win32 to the list of files Netbeans recognizes as text files: Tools->Options->Object Types->Textual Objects->File Extensions.
To show file extentions: Options->System Settings / <toggle "Show File Extentions">
There are several things to be set up in your home directory including your .login and .cshrc files. The easiest thing to do is to look at those files in someone else's home directory who is already doing AIDA development. The following are examples of things you want to add to your .cshrc (note, the Oracle stuff cannot be added to your .login instead, and must not follow the aidaSetEnv.sh, because ~ian/8ienvj sets LD_LIBRARY_PATH without regard to its previous value!).
# Oracle
source ~/.8ienvj
setenv TWO_TASK SLAC_TCP
# AIDA setup including setup of AIDA environment variable.
source /afs/slac.stanford.edu/package/aida/common/script/aidaSetEnv.sh
The following steps do a make in the production tree ($AIDA).
     cd $AIDA
     gmake -f common/script/MakefileAida.sun4 ACTION=clean
     gmake -f common/script/MakefileAida.sun4
The following steps do a make in your local development directory.
     cd ~/dev
     cvscheckout idl       (you might want to checkout things like these).
     cvscheckout edu
     cvscheckout common/script

     (modify the files that you checked out).

     cd ~/dev
     gmake -f common/script/MakefileAida.sun4

     (then return the files to cvs when you're done).
     cd edu/stanford/slac/aida/generic/
     cvsreplace someFileName.ext

     (then release the directory)
     cd ~dev
     cvsrelease idl
     cvsrelease edu
     cvsrelease common/script
TBD TBD TBD...
This documentation is now in the new labour area.
[Aida Home Page][SLAC Controls Software Group][ SLAC Home Page]
Author: Greg
White, 15-Jul-2001
Modified by: Robert C. Sass,
10-Jan-2003