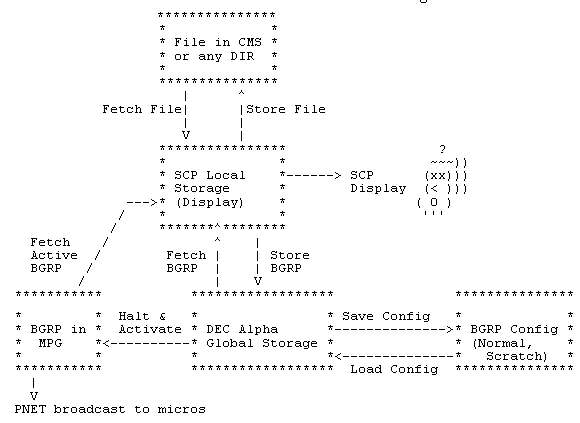
(Figure 3-1) Map showing how BGRP files are manipulated to and from various locations.
3. SCP and Related Files
Note: For advanced users, see Chapter 7 for information on the SLCCMS.
3.1 Introduction: What is "SCP"?
The SLC Control Program (SCP) is a huge executable that allows access to most of the machine devices used. It accesses the database, history buffers, data files, etc. Operators are the primary users and often modify the interface to meet our needs. This chapter will set forth the common changes that Ops make and how to implement them. First though, you need to SCP.
3.1.1 Which Machine to Use?
If you SCP from MCC, it will access the real (a.k.a. production) database and control system and give you information about real devices. If you SCP from MCCDEV, it accesses the development control system and database as well as only those devices hooked up for troubleshooting (like the LI31 micro upstairs). Lastly, for your information, AMW’s micro, AM00, is only hooked up to MCCDEV. If it dies and they call you for troubleshooting advice, know that they have to IPL from a SCP on MCCDEV.
3.2 How to Start and Stop
Most SCPs that run in the control room are either COWs (run on two workstations) or CALFs (run on a single workstation).
3.2.1 COWs
All COWs have two workstations. The one mounted at eye level is used for displaying the COW’s graphics displays. The one mounted at console level (waist high if you’re short) is specially equipped as a touch panel (TP). You can touch the screen or use the mouse to “click” or “push” a button.
3.2.2 CALFs
To log in a COW’s touch panel workstation (you don’t need to log in the display workstation), the username is COW##, with no password. Both numbers are required so COW1 is logged in as COW01. It’s ID in Errlog is V001.
Next start a DECterm by selecting it from the Applications menu in the System Manager window.
To start a SCP on a COW, in a DECterm just type scp.
To kill a SCP, from the Index Panel push the EXIT button (upper left hand corner) and answer “yes” to the prompt.
If you try to start a SCP on a COW and it gives the message that it couldn’t find a free slot, wait 5-10 minutes and try again. If it tells you that a SCP is already running, and one obviously isn’t, you might need to kill the rogue processes. First from any COW or EOIC_DESK DECterm, type:
>show user/full COW##
where ## is the COW number as above. This will list for you all the processes with their names and ID numbers running as COW##. The SCP process with have a name SCP_##. To kill this process type:
>stop SCP_##
-OR-
>stop/id=PID
where PID is the ID number from the show user display. If you still have problems, try logging out of the session and logging back in. If this still doesn’t work, from a DECterm logged into a different COW, kill all processes for that COW and try again (see Section 2.12.6 for more information on processes).
CALFs are run on a single workstation. The workstations in the control room are usually logged in as MCCSCP or EOIC_DESK. To log in a workstation to one of these accounts (EOIC_DESK only works from the workstation on the EOIC desk...) just type the user name (MCCSCP or EOIC_DESK) and no password.
To start a SCP on a workstation you have a couple choices. Many times, under the applications menu you can select “SCP on MCC” which will open a DECterm for you and start a SCP. Sometimes there are choices for the size: big and bottom. Bottom gives you a SCP where the windows show up at the bottom of the screen. The windows are small enough that you can see all of the touch panel window and the graphics window and half of the message window. These are also sized such that you can fit another set of three windows for another SCP above and be able to see both TPs and graphics windows simultaneously. The “big” choice creates windows that are somewhat larger and only one of these larger SCPs fits well on the workstation monitor.
The other choice for starting a SCP on a logged in workstation is to open a DECterm and type scp at the prompt. The process will then prompt you to:
ENTER SCP TYPE OR COWID:
Your choices for an answer (type ? to get this list yourself) are:
X for screen filling windows (TP and graphics) on an Xwindows device
XT for windows in the top half of a large screen Xwindows device
XB for windows in the bottom half of a large screen Xwindows device
W just like X but gives windows with a white background (default is black)
This implies that WB and WT are also valid. Type “X” is the same as “big” in the applications menu and “XB” is the same as “bottom” in the applications menu. It now prompts you to:
Please identify yourself:
Whatever you enter will show up on the SCP activity display from the network index. Most folks use their initials or the account (MCCSCP or EOIC_DESK) or the workstation ID (MCCX34, for example). This makes it somewhat easier to be Big Brother and figure out who’s doing what. Once you’ve answered this simple question, the SCP will start up.
To exit a CALF, the same process applies as for a COW: from the index panel, hit EXIT and say YES.
3.2.3 Unexpected SCP Exits/Crashes
If Something Bad happens, the SCP process might “crash.” When it does this, it should give you a prompt in the debugger, which is usually DBG>.
At this point, please type:
DBG>@SCPDEBUG
This will create a file that contains relevant information that might help a software person figure out what went wrong. Once SCPDEBUG is done, type exit or quit at the debug prompt then re-SCP. Please submit the problem to the software group through ARTEMIS. In the problem description please describe which button you pushed, what COW/CALF you were using, include that you ran @SCPDEBUG and at approximately what time.
3.3 Panel Files
3.3.1 General Information at a Glance
| File Type | PNL |
| Edit COM file | editpanel or just editp |
| Reference directory | SLCPNL, REF_SLCPNL, or SLC_PNL |
| Compile Command | CMP |
| CMS protected? (Need MCCDEV?) | YES |
| CMS library name | CMS_SLCPNL |
| References | Basic User's Guide, Chapter 4 |
| Reference On-line | doc$bug:bug.doc or look at other panels |
3.3.2 General Information (Verbose)
All touch panels on the SCP are file driven, meaning the SCP reads in a file and displays the information it contains. These files have a so-called fixed format (i.e. you have to type the right information into the right spot or else the SCP barfs), live in SLCPNL, and have file type PNL. The best place (only place?) to go for documentation on panel code is the Basic User’s Guide, a.k.a. BUG, chapter 4. This can also be found on the VAX in the doc$bug directory. This contains the definitive information about what to type where and what it should do in the PNL files.
There are two ways to muck with panel files: in your own directory or with the version in production. When you muck with a file in your own directory, and tell the SCP to look in your directory first for the panel code, then you can spend a lot of time developing a panel that no one else can see and debug it at your leisure. This is strongly recommended if you’re changing frequently used panels and might make mistakes. (See section 0.) When you muck with the production version, you have to reserve and replace the file with CMS and if there is a problem, then you have to reserve and replace again. If you’re making small changes you’ll most likely get right the first time, go ahead and edit the production version with EDITPANEL.
3.3.3 Determining which File to Edit
To figure out which panel file needs to be manipulated, from the panel you wish to change on the SCP, hit HELP. Across the top of the display should be something like:
Help for Panel: ANLGINDX
In this instance, the file to edit is anlgindx.pnl.
3.3.4 Running EDITPANEL
Because the editpanel program accesses CMS, you need to be logged in to MCCDEV to use it successfully.
EDITPANEL is a symbol defined as:
EDITP*ANEL == "@SLCCOM:EDITCMS CMS_SLCPNL CMP"
When you type editpanel, the editcms COM file is run, the CMS library CMS_SLCPNL is specified and the CMP command is used to compile. (The “*” in the command name just means you can shorten the command at that point if you want.) If you type just editp, it will prompt you for the name of the file you want to muck with. Otherwise you can type:
>editp filename
The COM file now checks to see if this file is already in existence. If so, it will prompt you if you want to reserve it (most likely you do, otherwise you wouldn’t be running the program in the first place). If the file doesn’t exist or you’ve successfully reserved the file, then it asks you if you want to EVE the file. (If you prefer LSE to EVE, see Section 2.11 for the command to redefine EVE as LSE.) After you’ve edited the file to your satisfaction, CTRL-Z. Now Editpanel asks you if you want to replace/if_changed your file. If you like your changes, say “yes.” If not, say “no.” If you replace/if_changed, it will unreserve the file for you. If you say “no”, if will ask you if you want to unreserve. If you don’t unreserve, the file remains in your directory, and no one else will be able to reserve it from CMS until you unreserve or replace.
3.3.5 Normal/No Cache/Use .PNL SCP Panel Modes
After you’ve altered a panel and replaced it, you can go to a SCP and check it out. If you select the panel and it doesn’t see the changes you’ve made, the SCP probably had the panel in its cache. The SCP remembers the last 20 panels you’ve looked at to make it faster to pull up those frequently used. In order to clear the cache, you need to either re-SCP (very time consuming and painful) or toggle the Change Panel Mode button (from the Index Panel go to the User Dev Panel (lower right hand corner) and this button is in the upper right hand corner). When you toggle the button from Normal to NoCache, the cache gets cleared and the SCP doesn’t keep a cache. This mode is somewhat slower because the SCP has to get the panel information every time. If you toggle to USE.PNL mode, the SCP will use the source panel code (instead of the compiled versions) in the directory/directories as specified by the SLCPNL logical. If you define the logical to point at your directory and the default directory, the SCP will look in your directory first for the panel code. See below (3.3.6) for details on how to use this mode. Now, if you toggle back to Normal mode, your cache is cleared, but the SCP will make a new one and use compiled panel code (i.e. be at its fastest). Thus if you edit a panel and need to clear the cache on a SCP to check it out, toggle from Normal all the way through NoCache and Use.PNL back to Normal, then go back to your panel.
3.3.6 Editing a Panel File from Your Directory
Many times you will need many tries to get a panel right and don’t want to mess with the whole CMS reserve/replace nonsense until you have the panel’s problems ironed out. This is easy to do and strongly suggested especially if you’re editing frequently used panels.
First make a panel in your own directory that is going to work (you can copy the production version from the SLCPNL directory to your space to get started if you need to). Now you need to tell the SCP to look in your directory first for panel code. Type:
>define slcpnl user_disk_slc:[mydir], slc_pnl
to make this definition. You can either type this in the DECterm then start the SCP, or in the DECterm of an already running SCP: type CTRL-Y, the definition command, then continue.
Once your SCP has slcpnl properly defined, toggle the Change Panel Mode button to USE .PNL mode. Now when you select your panel, the SCP should find it.
When you’re done, you should un-define slcpnl with:
>deassign slcpnl
3.3.7 Typical contents of a Panel File
The fields listed in this section may vary based upon the type of button in use but the generic form of a line in a panel file is:
FUNCTN: X,Y,button_label_text_,Btn_name,Var_name,Sbr_name,Dsp_name,I
FUNCTN can be any of the following: SCRIPT, BUTTON, SWITCH, SELECT, SHADOW, ASSIGN, DEASSN, and SPAWN, described in the sections below.
X,Y specifies the location of the panel button, with the format (column,row), so X gives horizontal and Y gives vertical. The rows and columns are numbered 0 through 7 so that (0,0) is in the lower left hand corner of the screen and (7,7) is in the upper right hand corner. Example: button (3,2), is the located in the fourth column from the left, and the third row from the bottom. Don’t forget to put the space between X and FUNCTN:
button_label_text is 18 characters long, and specifies a SCP panel button with a name containing three rows of 6 characters each, centered at location X,Y.
Btn_name (displayed when you push help then that button) is an 8-character field used to uniquely identify the button (mainly for button macros) on the panel independently of it’s X,Y coordinates.
Var_name is an 8-character symbol for the variable in which to load the 8-character button name (btn_name).
Sbr_name is an 8-character symbol which the SCP looks up in its symbol table to find which subroutine to call. When it calls the appropriate subroutine, it passes to it the variable (from var_name) with its value (btn_name).
Dsp_name is an 8-character symbol for which display routine to call. This is used primary with updating displays.
I is an optional field. If there is a “*” in the field and the subroutine name is coded, the subroutine is called upon panel initialization and every time the panel is selected. This is used for automatic displays as well as to write already selected information on the screen. For example with the fast feedbacks, if you’ve previously selected LI12LOOP, then when you go to the CALB/DIAG panel, LI12LOOP is displayed on the panel via a *’d line.
3.3.7.1 SCRIPT
SCRIPT buttons are used to write text on the panel at a specific location. In this case, the fields are:
SCRIPT: X,Y,Options ,Text->
Options include the size (large or small) and the vertical position of the text string within the button area defined by the X,Y coordinates. The default size is small. The vertical position is selected with the command line=n, where n is between 1 and 4. The lines are numbered from the top such that line 4 is the bottom line of the button area. The default position for large text is line 2, and for small text line 4. Examples:
SCRIPT: 0,7,LARGE,LINE=4 ,INDEX PANEL
SCRIPT: 3,5,LINE=2 ,CONTROL FUNCTIONS
Check out existing panel files for examples.
3.3.7.2 BUTTON
BUTTON buttons are used to tell the SCP to do something (typically). They have the format shown above, with the fields defined as the generic example given at the beginning of the section.
Examples:
BUTTON: 3,6,SCALE FACTOR ,BPMOSCAL,BPMOPARM,BPMUNITS, ,*
Here, BPMOPARM variable is stuffed with the value “BPMOSCAL”, and BPMUNITS subroutine is called. Because of the asterisk at the end of the line, the subroutine is called every time the panel is selected and during initialization of the panel (first time it’s called).
BUTTON: 0,4,DISPLYMAGNET ,MAGDALL ,MGNTDISP,DEXEC ,MCTLDISP
MGNTDISP is loaded with the string MAGDALL, the display routine MCTLDISP is called through DEXEC (display executive routine) which will schedule the display’s updates.
Sometimes more variables are needed and are added on the second line with the value preceding the variable:
BUTTON: 2,3,2-9 DUMP ON ,QBUTT_01, ,TMATADJ , ,
> TRIG 813,PRIMUNIT, LI02,PANLMICR,REAC ,TIMEFUNC,
Here, TRIG 813 is loaded into PRIMUNIT, LI02 is loaded into PANLMICR, REAC is loaded into TIMEFUNC and TMATADJ subroutine is called. (In case this is just serious gobbledygook to you, in almost-English, this button reactivates TRIG LI02 813.) The QBUTT_01 is used to give the button a unique name so that button macros don’t get confused. It’s not actually used by the SCP code in this example.
3.3.7.3 SWITCH
SWITCH buttons are used to select one and only one of a group of buttons with identical var_names. An example of this would be on a Linac sector’s magnet panel. You want to choose QUAD 201, do stuff to it, and then select QUAD 301. When you select QUAD 301, it gets a bar on its fourth line, and the bar on QUAD 201’s button disappears. Only one magnet at a time is selected on the panel. The fields within a SWITCH line are identical to those of BUTTONs.
Example:
SWITCH: 0,6,QUAD 201 ,QUAD 201,MGNTUNIT,MAGDRVR
This function is also used with panels of many multiknobs (tune panels).
3.3.7.4 SELECT
SELECT is used as a button to choose another panel. The fields within a SELECT line have the same definitions as those for BUTTONs. Example:
SELECT: 7,7,INDEX ,INDEX
If this button is pushed, the index panel is selected.
SELECT: 0,4,NETWRKINDEX ,NETWORK , ,DEXEC ,DBEXDISP
In this case, when the Network Index is selected DBEXDISP is scheduled and is displayed automatically.
3.3.7.5 SHADOW
SHADOW buttons are not drawn on the panel, they are used to call subroutines or display digital statuses, but cannot be “pushed,” like a standard button can. Their panel code is the same as for BUTTONs, but no box is drawn around the option displayed label. Example:
SHADOW: 7,7, ,LI13 ,MGNTSECN,MAGUNIT ,MAGDRVR ,
> LINAC ,MGNTDGRP,LINAC ,MAGXDGRP, , ,*
This shadow button sets up the LI13 magnet panel defining the sector and DGRP and initializes the panel.
If the 18-character space for the label text is filled, it is displayed in the usual 3 lines of 6 characters, used for buttons.
Some care has to be taken with SHADOW buttons. Where they are within the panel code file may affect their functioning. Be especially careful with HSTB panel shadows and PPS panel shadows; serious danger lurks within these waters.
3.3.7.1 ASSIGN and DEASSN
ASSIGN buttons are used to assign devices or multiknobs to physical knobs for tweaking. In this case, the first seven characters btn_name field are arbitrary with the eighth character determining which knob is assigned to. Example:
ASSIGN: 0,0,ASSIGN KNOB 0 ,KNOB 0
This uses the last subroutine assigned to KNOBTYPE (like MAGTWK, MKBDRVR,KDRVRADJ, and TMATKNOB) to handle the knob turning.
DEASSN is used to deassign all knobs. It takes the form:
DEASSN: 7,1,DEASSNALL KNOBS ,
3.3.7.7 SPAWN
SPAWN buttons are used to spawn a single DCL command and then return to the current panel. This is used to run ACCESS files, start MATLAB, spawn a DECterm, and to run other COM files (to name a few). SPAWN buttons take the form:
SPAWN : X,Y,LABEL TEXT ,Btn_name,Command
Typical uses include:
SPAWN : 3,7,MATLAB ,MATLAB ,MATLAB
SPAWN : 4,6,SHOW STDZ/ ACCESS,SHO_QUE ,@SLCCOM:SHOW_ACCESS
SPAWN : 4,7,NORTH RING OFF ,NDR_OFF ,@SLCCOM:ACCESS NDR_OFF
SPAWN : 6,5,SPAWN DCL ,SPAWNDCL,SPAWN
3.4 Button Macros
3.4.1 General Information at a Glance
| File Type | TPU (Text Processing Utility) |
| Edit COM file | none |
| Reference directory | SLC_BM |
| Compile Command | TPUCOMP |
| CMS protected? (Need MCCDEV?) | NO |
| References | Button Macro User's Guide and VAX Text Processing Utility Reference Manual |
| Reference On-line | doc$guide:bm_users_guide.latex |
3.4.2 General Information (Verbose)
Button macros are text files of button push commands in a language called TPU, Text Processing Utility. Button macro files have file type TPU and live in the SLC_BM directory. This directory logical gets defined differently depending which machine you’re logged into (MCC vs. MCCDEV). On MCCDEV it gets defined as:
slc_bm == CTRL_DISK:[PROD_SYS.BUTTON_MACRO]
You may need to look in both directories to find the file you want.
There’s a reference in the control room and also on-line called Button Macro User’s Guide by Steve Moore written in 1989. The LATEX source can be found in DOC$GUIDE:BM_USERS_GUIDE.LATEX. To print a 33-page read-able version on the Imagen behind main control, type:
>imprint_dvi/que=mcc$print doc$guide:bm_users_guide.dvi
All of the information in this section and much more can be found there. He reprints the on-line help from the SCP, and gives good background information, a nice list of references, and a complete listing of utilities and what they do, plus how to edit the database of which macros correspond to which panels and see when macros were last used.
You can create button macro files from the button macro panel (reached by pushing F8 on the SCP’s keyboard) or from the VAX by editing the desired file.
Button macros are panel specific, i.e. if you create a macro from one panel, you can only run it from that panel. When you hit F8, the button macro control panel is selected and a list of button macros associated with that panel are displayed. (This panel has lots of help to explain what each button does. Check it out!)
3.4.3 How to Create a Button Macro from the SCP
The basic button macro is created by hitting the LEARN button on the button macro control panel. Now the SCP is in RECORDING mode. Just hit the buttons in the order that you want to macro to do it. When you’re done, hit F8 then, if you want to save it, hit REMEMBER. This will prompt you if you want it to be a PEP (or SLC or NLCTA) or UNIVERSAL macro, for a unique title, and your name.
This first question is a function of the mode your SCP is in (what is your index panel? PEPII, SLC or NLCTA?). If you choose UNIVERSAL, your macro will be listed regardless of the mode of the SCP. If you choose SLC, PEP, or NLCTA, the macro will only be available in that mode. (Regardless of this choice, it is always available from a button on a panel.)
If you choose to have your macro be mode specific, its file’s title (in SLC_BM) will be the title you give it preceded by the mode name surrounded by $’s; i.e. $PEP2$MY_TITLE.TPU or $SLC$MY_TITLE.TPU.
When choosing a unique title, be aware that if you want a button on a panel to call your macro, the length of its title needs to be less than or equal to 8 characters. If you don’t plan to put it as a button on a panel, then it can only contain up to 39 characters.
3.4.4 Panel Buttons for Button Macros
The format for the panel code to call a button macro is:
BUTTON: 0,4,System Shut- down,SHUTDOWN,MACNAME ,BMBUTMAC
This button when pushed runs the SHUTDOWN macro which lives in SLC_BM:SHUTDOWN.TPU.
If you add a button to a panel to run a button macro, please consider editing the associated help file (see section 3.5). It’s really nice if you push help, then the button macro button, that the button macro file is listed. To have this happen, in the help file you need the following:
2 BTN_NAME
$Please try TYPE SLC_BM:name.TPU
btn_name is from the panel code (and in this instance is the same as the name of the macro (minus the .TPU) and name is the file name.
3.4.5 Basic TPU Commands
The best way to have a button macro do anything besides push a small number of buttons in a certain order then stop, is to find a macro that does something similar, and steal the code necessary from its source file.
Sometimes though, unfortunately, these things need to be constructed from scratch. The basic feel of TPU is Pascal or C like, for example “:=“ is used for assigning a value to a variable and “=“ is used for the logical equals. Basic if-then-else logic also works with a “;” at the end of executable lines. Some basic symbols and keywords are as follows:
| ! | denotes a comment line, can be used in the middle of the line with characters to the right of the ! ignored. |
| procedure | The first line of the macro, followed by the procedure/macro name. |
| := | used to assign a value to a variable (variable := value) |
| = | logical equals (if (variable=value) then...) |
| > | logical greater than, less than |
| < | logical less than |
| <> | logical not equal to |
| ; | used at the end of all executable lines, endifs, and returns |
| local | used to declare a list (separated by commas and ending with a semicolon) of local variables used at the end of all executable lines, endifs, and returns |
| + | used for addition but also for concatenation of character variables |
| ' ' | single quotes used to denote characters or character strings |
| FUNCTION NAME & Basic Description | USAGE (in bold) & Example (no bold) | ARGUMENTS & RETURNS |
|---|---|---|
| bmcompile compiles the tpu file which can then be called and executed later | bmcompile( filename ); ! This line compiles the code: bmcompile('slcbm:my_file.tpu'); ! This line executes the code: my_file; | filename: TPU file to be compiled; should have SLCBM: in front and .TPU at the end, and be in single quotes |
| button_bar turns on or off a bar on the button | button_bar( button, on_or_off); button_bar ('sledcomm',bar_on); | button: button name, 8 characters (blank filled), in single quotes on_or_off: takes the values: BAR-ON or BAR_OFF |
| button_present finds out how many of a given button (name) are on the panel | n_buts:=button_present(button); (no examples found) | button: button name, 8 chars (blank filled), in single quotes n_buts: number of buttons on the current panel (integer) |
| button_text Extracts the text from a given button at a certain line number and returns success or failure status | stat:=button_text(button,line,text); stat:=button_text('li18loop',4,var); if (var<>'NO TEXT WRITTEN') then... | button: same as above line: number between 1 and 4 (numbered top down) text: text written on that line or "no text written" if the button has a bar but no text. status: 1=success, 0=failure |
| console_write Supplied text is sent to the SCP | console_write( text); console_write('Error, exiting'); | text: text to be sent to the SCP in single quotes |
| enterdata fills the entry buffer for the next button push which asks the question already answered by the entry | enterdata( entry); enterdata('100'); pushbutton('BPMAVG '); | entry: string data constant or variable, numerical or character |
| get_configuration determines the next available config number to be used on a "save" config | num:=get_configuration(dir_name); ans:=get_configuration('scratch,laser'); | dir_name: directory or name string num: config number or bad status condition |
| if-then-else-endif | if (logical statement) then executable statement; else executable statement; endif; | see example above |
| loop, endloop, exitif loops through sandwiched statements until exitif condition is met | loop executable statements; exitif counter>=20 endloop | Unless you want an infinite loop, you need a local variable counter that gets incremented (or decremented) |
| pushbutton | pushbutton( button); pushbutton('SETTLE '); | button: same as above |
| pushbutton_until pushes a given button until a specified string appears on the specified line or the maximum interations have been reached | pushbutton_until( button, text, line, max_iter); pushbutton_until( 'diff ','abslut', '4', '5'); | button: same as above text: target text to achieve line: line number (1-4) where text should appear max_iter: max # of button pushing attempts |
| return forces the macro to stop executing | return; | forces the macro to stop executing |
| scp_spawn Executes a command in the DCL environment, i.e. spawns a command | scp_spawn( command); scp_spawn('@slccom:doit.com'); | command: command to be executed in DCL environment |
| user_prompt prompt the user with text and gets an answer | response:=user_prompt( prompt ); name:=user_prompt( 'Enter config title: '); | response: variable to hold what the user responded prompt: The prompt to appear in the box |
| wait | wait(seconds); wait(1); | seconds: integer number of seconds wait |
3.4.6 TPUCOMP
If you get your button macro all ready to go, you say, “execute” and it fails to compile, this means that you have some type-o or have used a spiffy command incorrectly. To see off-line if it will successfully compile, try:
>tpucomp filename
It may or may not give helpful advice. Per usual programming practice, thinking like a computer and willingness to do lots of trial and error come in handy.
3.4.7 Modifying the Button Macro Library
(N.B. This information is paraphrased from Steve Moore’s Button Macro User’s Guide in the “Offline Database Utilities” section.)
Several utility programs exist to alter the Button Macro database, which contains the association between macros and panels.
BM_LOAD_DB is used to load or associate a Macro with a target panel. From the SLCBM directory type:
>run bm_load_db
This will prompt you for your name, the macro name, and the panel name. Once the operation is done (a message will be reported) it will prompt for another macro name. A
BM_XFER_MACRO is used to take a given Macro and change its association from one panel to another. It is run in the same manner as bm_load_db above. It will prompt you for the name of the Macro, the source Panel (from) and the destination panel (to).
BM_DUMP_DB is used to dump the contents of the Button Macro database into a formatted output file. It is run the same as above and will produce a bm_dump_db.log containing the information.
BM_GET_STATS is used to produce a summary of statistics regarding the Button Macro database. When the program is run, it dumps the information to bm_get_stats.log. The statistics include total number of active macros, the number of panels that contain at least one macro, and the total number of executions performed since the database was created.
BM_MODIFY_DB is used to alter the database is various ways. It is run (like the programs above) and prompts for username and panel name. It then cycles through the associated button macros and for each prompts you to: step to the next macro, activate this macro, delete this macro, select another panel, put back to development, put into production, and refresh the display.
The Button Macro User’s Guide goes into much more detail about what these programs do.
3.5 SCP Help Files
3.5.1 General Information at a Glance
| File Type | HLP |
| Edit COM file | edithelp |
| Reference directory | REF_HELP_DISPHELP |
| Compile Command | CMP |
| CMS protected? (Need MCCDEV?) | YES |
| CMS library name | CMS_HELP_DISPHELP |
| References | Basic User's Guide, see next line |
| Reference On-line | (a reference is being created) |
3.5.2 General Information (Verbose)
This section refers to the text displayed on the graphics window of the SCP when the HELP button on the touch screen is pushed. The text is contained in files of file type HLP and protected by CMS. These files can be edited with a special COM file (just like EDITPANEL) as follows:
>edithelp filename
The filename is just the name of the panel file, with an .HLP extension instead of .PNL. There are two types of entries in a help file: panel help, the help displayed when HELP is pushed while on that panel, and button help, the help displayed when a specific button on that panel is pushed. The syntax for panel help is:
1 pnl_name help_text
where help text is the help displayed for the panel. The syntax for button help is:
2 btn_name help_text
where help text is the help displayed for the button on the panel pnl_name.
Current versions of help files live in the REF_HELP_DISPHELP directory. The name of the CMS library is CMS_HELP_DISPHELP, if you ever need it.
If you’ve created a new HLP file, either use edithelp or copy an already existing HLP file then modify it. The reason behind this advice is that the header at the beginning of the file is important.
3.5.3 To List a File within a Help File
A special command exists for use within a help file to list the contents of a file when that part of the help file is to be displayed.
$Please try TYPE filename
This will list the contents of the file onto the graphics window.
3.5.4 How to Have a Panel Button Display a Help File
If you want a button to display part of a text file without button macros or involving the HELP button, you can edit the panel’s help file then use the following in the panel code:
BUTTON: 3,7, Help for PF ,PFHELP , ,DEXEC ,HELPHELP
> DISPHELP,HELPLIBR,DISPLY ,HELPKEY1,PFHELP ,HELPKEY2
Before modifying this, you need two pieces of information: the name of help file (goes in the field before HELPKEY1) and the name of the button normally pushed to get this information via HELP (goes in the field before HELPKEY2).
Another way to put it is to look in the HELP file that contains the information. The 8 characters after the number 1 (a.k.a. the panel name) go before HELPKEY1 and the 8 characters after the number 2 (the button name, right before your information) go before HELPKEY2.
It looks like good form to have the button’s name (the PFHELP on the first line in this example) to match the stuff in front of HELPKEY2. You might get away without these matching, but it might be more confusing.
(Aside: it looks to me like you might be able to display information from other help-type libraries, like the glossary for example.)
3.6 Multiknob Files
3.6.1 General Information at a Glance
| File Type | MKB |
| Edit COM file | none |
| Reference directory | MKB, also from SCP MULTIKNOB Panel |
| Compile Command | none |
| CMS protected? (Need MCCDEV?) | NO |
| References | User's Guide to the Multi-Device Knob Utility |
| Reference On-line | doc$poop:mkbguide.mem |
3.6.2 General Information (Verbose)
Multiknob files are files containing a list of devices that allow all the devices to be altered together in a controlled manner. These files have file type MKB and live in the directory defined as MKB. A very complete reference can be found on-line at doc$poop:mkbguide.mem. Hard copies of this have been sighted in three-ring binders in and around the control room. (It’s only 9 pages, you may just want to read it on-line or print it out.) Most multiknob file manipulations (except editing) can be accomplished from the Multi Device Knob Panel from the SCP Index Panel. Selecting, viewing the directory, and viewing the contents of a file are all done easily from this panel.
3.6.3 How to Attach a Miltiknob to a Panel Button
The panel code for having an assignable multiknob selectable on a panel is:
SWITCH: 0,5, E- PHSRMP MULTI,PHSRMP ,STRING01,MKBPANEL
> PHSRMP ,MKNOBFIL, , ,MKBDRVR ,KNOBTYPE
Here, the less than 8 character name (PHSRMP) goes in two spots: as the button name and before MKNOBFIL.
3.6.4 Sample Multiknob File
PHSRMP.MKB:
!NDR Phase Ramp
SET/LABEL=PHSRMP
SET/SENS= 5.0
SET/PRIM=PHAS/SECN=VDES
SET/MICR=DR12
DEF/DEV=(*,*,61,*)/COEFF=1
DEF/DEV=(*,*,64,*)/COEFF=1
SET/START=0.0
What the lines mean:
SET/LABEL this sets the characters to be displayed in the knob window when the knob is assigned
SET/SENS this sets the sensitivity of the knob. Its value is the change in knob value per turn of the physical knob
SET/PRIM this sets the Primary of the devices to be altered, same for SECN (secondary) and MICR (micro)
DEF/DEV=(*,*,61,*)/COEFF this defines the device to use the primary, micro and secondary as already defined and to use unit 61. The COEFF is the coefficient to use relative to the knob number. Both of these devices turn together in the same units as the knob number.
SET/START this assigns the initial knob value
3.6.5 Common Commands used in Multiknob Files
There are two command verbs: SET and DEF. Set is used to set knob characteristics and defaults. DEF is used to define one or more devices and a knob function to control them. The SET qualifiers are as follows:
/PRIM =value set a default primary name
/PRIM = (value1,value2,...) set a list of default primary names
/NOPRIM reset the default specification of primary names
/MICR = value set a default micro name (can also specify a range of micros (LI01-30)
/NOMICR reset any default micro names
/UNIT = value set a default unit number. ALL* is allowable. A list can also be given and /NOUNIT can be used.
/SECN = value set a default secondary name. A list can also be give and /NOSECN can be used.
/BEAM = value set a beam number (if the secondary is TDES) for a triggered device. A list can be given and /NOBEAM can be used.
/LABEL = value the first 10 characters of the value are used to label the knob. The default is the input file name
/SENS = value the knob sensitivity. The value is the change in knob value per knob turn. This has a default value of 1.0.
/START = value the initial knob value (default is 0)
/START = (PRIM,MICRO,UNIT,SECN) this assigns the initial knob value to the database value of the specified device. No *’s are allowed in the device specification
/TIMEOUT = value this can be specified for a knob which will become stale after some time. After the value in minutes have elapsed since assignment, the knob will be deactivated upon the next use and must be reassigned.
/LIMITS = (MIN,MAX) this specifies the limits for the knob value. There are no limits in the default case.
/WARN to indicate that device control conflicts should be reported. /NOWARN can also be used.
/ABS this indicates that device control values will always be set according to the values calculated from their knob function.
There are four choices for the knob function: linear, polynomial, sine and cosine. Linear is the default. To get the others or a non-unity linear coefficient use the SET command with the following qualifiers:
/COEF = value A linear function with the value equal to the coefficient
/POLY = (value1, value2,...) a power series function starting at the zeroth power. Up to 11 terms are accepted, additional ones are ignored.
/SINE = value a sine function is used with the value determining the amplitude of the sine wave
/COSINE = value a cosine is used with the value giving the amplitude
These can also be used after a device definition as follows (any part of the names below can be assigned default values by using the wild card character * ):
DEF/DEV = (PRIM, MICR, UNIT, SECN) adds to the list of devices to be controlled by the knob. PRIM is the primary, MICR is the micro, UNIT is the unit number and SECN is the secondary. This specification is valid for all devices except triggered devices.
DEF/DEV = (PRIM, MICR, UNIT, TDES, BEAM) adds a triggered device to the list of devices controlled by the knob. The secondary name TDES is used to indicate that a Beam Code specifier is present. BEAM is the beam code.
3.6.6 Irwin knobs
Irwin knobs are special knobs that calculate the device values at each knob movement. They control devices in nonlinear fashions. These knobs cannot be assigned. They can only be changed by entering the knob’s file name in the SCP, then entering knob value, from the Multi Device Knob Panel.
The main Irwin knobs that we use are:
NFFUT$XMAG, NFFUT$YMAG, SFFUT$XMAG, and SFFUT$YMAG
These control the X or Y magnification (in the appropriate final focus) at WS15. These are tweaked on the angular divergence measured on the outgoing WS4. More help on these specific knobs can be found by listing their contents. Also more help on USER knobs in general can be found in the User Guide to the Multi-Device Knob Utility mentioned in the general information above.
3.6.7 Using Matlab to Create Multiknobs
From Matlab (see Section 4.1) there is a BUMP routine written by Paul Emma in 1989. The following is stolen directly from Matlab’s response to “help bump.”
BUMP calculates 3-corrector or 4-corrector position or angle closed beam position bumps based on the SLC database model. The point of the bump and the amount is prompted for. The correctors are also prompted for. The output format may be any of the following:
Corrector angles [urad]
Corrector strengths [kGauss-m]
Multiknob coefficients [kGauss-m/KNOB]
Creation of a properly formatted multiknob file
The output of choice number 4 above may be immediately assigned as a knob on a COW. Many clear menus are given for complete bump specification. Help is usually available by typing ‘?’ at the prompt.
3.7 Display Files
3.7.1 General Information at a Glance
| File Type | DSP |
| Edit COM file | EDITDSP |
| Reference directory | REF_DSP |
| Compile Command | CMPDSP |
| CMS protected? (Need MCCDEV?) | YES |
| CMS library name | CMS_DSP |
| References | User's Guide to Summary and other User Defined Displays |
| Reference On-line | doc$user:summar_manual.latex |
3.7.2 General Information (Verbose)
Display files are hard-coded files that generate displays to be displayed on the SCP. These are CMS protected, have file type DSP, and live in REF_DSP. The language inside the DSP file is somewhat obscure and is best manipulated with help from the User’s Guide to Summary and other User Defined Displays written by Ralph Johnson. To print this out try the command:
>imprint_dvi/que=mcc$print doc$user:summary_manual.dvi
This gives all the gory details about what all the command options are. This document (the one you are reading) will not repeat this information when so much is necessary.
3.7.3 Editing a DSP file
Because these files are CMS protected, the easiest way to deal with reserving, editing and replacing is to use the COM file:
>editdsp filename
Like editpanel, this will take care of the gritty details for you. You just need to answer the prompts.
If you don’t use EDITDSP, after you replace the file in CMS, you need to compile your file with the cmpdsp command. See Chapter 7 for details.
3.7.4 Step by Step for creating a DSP File and getting it on a Panel
If you are creating a new file, start with step 1. If you are modifying an already existing file, start with step 4. These steps assume that you aren’t starting from scratch. It assumes that you have a file that’s somewhat like what you want to create that you can copy then modify.
1. Decide which DSP file you wish to copy by hitting HELP then the button that displays it from the SCP. It will look something like
Help for Panel: POSMULT, button: POSLINTM
In this case the file to get is REF_DSP:POSLINTM.DSP.
2. Copy the file (using the VAX command copy) from the ref_dsp space to a directory of yours, for example:
>copy ref_dsp:poslintm.dsp new_file.dsp
3. Edit the file (see Section 2.11 for editing tips) until it looks exactly as you want it.
4.At a prompt on MCCDEV from your account, type:
>editdsp filename
This will prompt you if you want to edit the file (it’s up to you), if you want to create the “cms_element” (yes), it then asks “do you want to distribute to production?”, say YES. If it encounters a compile error, it will ask if you want to reserve and edit the file again.
5. Now do a editpanel (see Section 3.3 above) on the panel to which you wish to add the button (POSMULT in the example above). The panel code for the button is given below in Section 3.7.5.
3.7.5 How to have a Panel Button call your Display
The following is the panel code you need to have your display on a button:
BUTTON: 2,0,SDR ForwrdPower ,SDRFORW ,DCXPDNAM,DCXPTPIF,DEXEC
“SDR Forwrd Power” is the text on the button, SDRFORW is the name of the DSP file, and the rest tells the SCP what to do when the button is pushed.
3.7.6 Common Displays generated with DSP
3.7.6.1 Displays of Status Boxes
The most watched DSP display of status boxes is the SDS CUD. Other ones include the PPS Access State Displays, LINAC Hatch status, VVS display, LINAC MPS display, MPS logic displays, etc. If one of these looks like what you want, you should pirate them. Look in the panel code (and use the BUTTON text example above) or use the button’s help to determine its name. To form these displays and assess your options, check out the “Static Display Formats” section of the User’s guide mentioned above. It shows how to put the following on a display: text, circles, arcs, and vectors. The next section (in the reference guide) on device specifications shows how to define devices for summary displays.
3.7.6.2 Multi-Plots
Another common display used by Ops is the multi-plot display, either four small analog histories on one page or multiple histories overlain on one large graph. Examples of the first type include all the luminosity plots and histories of wire scanner parameters. Examples of the second type can be found off the analog multiplot history panel (off the analog panel). These examples can all be stolen from the reference directory (REF_DSP).
3.7.6.2.1 Creating a "Standard" Overlain Histories Multiplot
A program exists to write a DSP file that will overlay given devices on a fixed scale window. This program is called CREATE_DSP and lives in USER_DISK_SLC:[JNELSON.DSP]. There are actually two versions: but since only the MCC and MCCDEV nodes (Alphas) are being used, you’ll access the create_dsp_DEC Alpha version. If you are logged in to MCC or MCCDEV, to run the program from one of your directories, type:
>rnb user_disk_slc:[jnelson.dsp]create_dsp_DEC Alpha
(Please don’t set def to the above directory and fill up Janice’s quota!) If you’re already on user_disk_slc, then you don’t need to type the disk information (type rnb [jnelson...). This will prompt you for the following information which you will want to have ready to go:
-Your name
-The title for the top of the plot (followed by a “!”)
-Number of HSTBs to put in the plot (max = 6)
-Do you want a Log scale (Y/N)?
-Vertical minimum
-Vertical maximum
-For each HSTB it prompts you for:
Primary
Micro
Unit number
Secondary
Does it have a channel name (Y/N)?
If Yes, Channel Name (needs to be in CAPS!)
Common name, for the color key at the bottom of the display
-Filename with a DSP extension (needs to be 8 or less characters if you want to have it on a button)
The reason for the maximum number of plots is that there are only 6 unique colors. You can go in later and cut and paste in the file to create more, but you’ll have to repeat colors.
Once you’ve run the program, it will create the file for you, now you just EDITDSP the file name you gave it.
Also consider writing a COM file to run the program so you can get the type-os out before running the program. See TEST.COM in the [jnelson.dsp] directory for an example. Its output is TEST.DSP in the same directory.
3.7.6.2.2 Trick to Obtain an ASTS Unit Number
Many times for a given Analog Status you know the micro and the channel name but not the unit number. Two easy ways to get this information: one, do a history plot of the device and look at the information above the plot on the display; two, with the analog selected, from the analog status diagnostic panel, hit the Diagnostic Display button. The information, from the left on this display, is micro, then unit number, followed by the crate and module location, etc. One hard way is to search through all the DBS (database) files for the channel name then note the unit number.
3.7.6.3 Thermometer plots
Another useful DSP display is the so called thermometer plot. These display the analogs as either sticks whose heights are proportional to their values or as bubble–type thermometers. Commonly seen examples of these include the FB31 and EP01 fast feedback displays that show all the phases, et.al. and the BSY temps displays. The designer Z-plots also seem to be loosely based on thermometer plots.
3.8 Beam Group and Modifier Group Files
3.8.1 General Information at a Glance
| File Type | BGRP |
| Edit COM file | EDITBGRP |
| Reference directory | REF_MPG_BGRP |
| CMS protected? (Need MCCDEV?) | kind of (see below) |
| CMS library name | CMS_MPG_BGRP |
| Reference On-line | BGRP panel on-line help [teg.spec]bgrp_new_syntax.txt [teg.newbgrp]new_bgrp_syntax.doc doc$design:new_bgrp_design.doc |
3.8.2 General Information (Verbose)
The BGRP files are used by the MPG to determine which beam codes are broadcast when, with what modifiers and at what rate. The BGRP Control Panel from the SCP is the main (only?) way to get BGRP information into and out of the MPG. As the manipulation of these files GREATLY impacts the machine, only experienced or supervised novice users should modify these files as well as manipulate the BGRP in the MPG. Given this, the information in this document does not intend to teach beginners how to modify BGRP files. Instead, it aims to include very useful, but easily forgotten information. The on-line documentation (BGRP panel on-line help, [teg.newbgrp]new_bgrp_syntax.doc, and doc$design:new_bgrp_design.doc) provides a good introduction as well as some nitty-gritty design details that you might not find elsewhere.
For beginners, see Section 3.8.4 on deciphering BGRP displays. Beam Group files are of type BGRP and live in personal, CMS reference, and the BGRP directories.
3.8.3 CMS versus Configuration Files
A CMS library (CMS_MPG_BGRP) exists with its corresponding reference directory (REF_MPG_BGRP). The Config Utility gives you a nice list with comments of the directory. To get the same for CMS, you need at least three commands (SLCCMS, Set library..., and show history..., if you were curious), and you need to be logged into MCCDEV. Chapter 7 now covers most CMS information.
Bottom line: Use the BGRP config utility until you see an expert (or have one tell you to) use the CMS library. Figure 3-1 below (stolen from Mike Stanek) shows how the buttons on the SCP interact with the different storage locations for the BGRP information.
3.8.4 How to Decipher a BGRP File or Display
If you wish to view a BGRP file, you can push Fetch BGRP, Fetch Active BGRP, or Display BGRP. Individual MGRPs (see below for explanation of an MGRP) can also be displayed with the Display MGRP button which will give you a scroll menu so you can choose which one you want to view.
If the BGRP you want to see isn’t in the Global Storage or the MPG, then you need to Fetch File to (get it into Local Storage so you can) see it. The SHOW SOURC/TRANSL button lets you toggle between SOURCE, TRANSL, and TERSE. SOURCE shows what the saved file actually looks like (very terse and just a little obscure). TRANSL and TERSE both translate the SOURCE version into something a bit more familiar. TERSE is similar to TRANSL just without all the PNET_ARRAY definition statements. The parts described below are from a TRANSL display.
BGRP SLDPEP2, TS 1 & 4, default rlarea = LER_INJ
This is the first line and gives the name of the BGRP, which time slots (TS) it runs on, and what the default rlarea is. RLAREA is the rate limiting area and forces which one to use as the default for the BGRP. Each RLAREA has its own MPS Algorithm (and its own MPS CUD). These algorithms take MPS device information (et. al.) and decide what rate (fullrate, limit_hi, limit_lo, injlimhi, and zerorate) the rate limiting area should be at. This rate is then passed to the MPG. It uses the incoming rate information and decides which MGRP (modifier group) to run.
COUNTERS (CT_SIXTYHZ=2, CT_THIRTYHZ=4, CT_TENHZ=12...)
This is the typical form for the second line. This information defines a number of counters and gives how many time slots to count to achieve the desired rate. The counters are cyclic and count from zero to one less than the numbers given then start again at zero. For example, the CT_SIXTYHZ counter will always have the value 0 or 1. CT_TENHZ will have a value between 0 and 11. CT_SIXTYHZ only needs to count to 2 because 60 Hz is every other time slot (as specified in the BGRP line). To get 10 Hz, you need to count to 12 because every 12th time slot is 10 Hz.
NUMERIC_VARS (MGRP_NAME=0, DAMPTM_NDR=2, DAMPTM_SDR=4)
These lines are used to define certain variables as constants. This way, if we need to change from a short store to a long store in the NDR, we only have to change the value of this variable in this one place, instead of in every place that DAMPTM_NDR is referenced in the BGRP.
PNET_ARRAY PNET_BC9, BEAMCODE(9, 1H3L, RLAREA=HER_INJ)
This line starts a definition of a macro of sorts. The PNET_BC9 names the PNET_ARRAY. After the BEAMCODE is the beam code number, its pattern and the associated RLAREA. The pattern, 1H3L, defines that beams repetition rate. Of alternating time slots 1 and 4, fire on the first time slot 1 (1H=1 high), then skip the next three time slots (3L=3 low): the next TS4, TS1 and TS4. Then the pattern repeats, and the beam code is broadcast on the next TS1
This pattern can be displayed graphically as well (as seen below) as:
*---*---*---*---*---*...
Here the * represent “highs” or time slots when the beam code is broadcast, and the _ represent “lows” when the beam code is not broadcast.
{ flip (1H3L) 30 Hz *---*---*---*---*---*---
This shows a modifier to be broadcast as part of the PNET_BC9 PNET_ARRAY. This modifier is scheduled to go out every time beam code 9 gets broadcast (30 Hz). The other modifiers before the “}” also go out as part of this group.
This PNET_ARRAY and the others defined after it, are all used later as short cuts to represent all the modifiers contained between the curly brackets.
After all the PNET_ARRAY definitions comes a huge if-then-else statement called MGRP_FIND. These nested if statements use the rate limit states of the various RLAREAs, as given to the MPG by the MPS, to determine which MGRP to use. A short chunk of this follows:
MGRP_FIND
{IF (ZERORATE,HER_INJ)
IF (ZERORATE,FFTB)
IF (ZERORATE,LER_INJ) MGRP_NAME = H0_L0_F0
ELSEIF (INJLIMHI,LER_INJ)MGRP_NAME = H0_L2_9_F0
ELSEIF (LIMIT_LO,LER_INJ) MGRP_NAME = H0_L1_F0
ELSEIF (LIMIT_HI,LER_INJ) MGRP_NAME = H0_L10_F0
ELSEIF (FULLRATE,LER_INJ) MGRP_NAME = H0_L30
ENDIF
Here, if the HER_INJ RLAREA is at zero rate, and the FFTB is at zero rate and the LER_INJ is at zero rate, then use the MGRP H0_L0_F0, meaning HER-zero-LER-zero-FFTB-zero. If on the other hand, HER_INJ and FFTB are both zero but LER_INJ is at INJLIMHI, then use the MGRP H0_L2_9_F0.
All this huge if-then-else statement does, is ascertain which MGRP to use. After this huge mess comes the individual MGRP definitions. First the H30_L0 MGRP.
MGRP H30_L0
{ IF (CT_SIXTYHZ = 0)
IF (CT_THIRTYHZ = 0) PNET_BC9
ELSE PNET_BC8_FULL, M_HALFHZ
ENDIF
ELSE
PNET_BC4
ENDIF
}
This is where the counters come into play. It checks to see what numbers the counters are at, then determines which PNET_ARRAYS and/or modifiers to broadcast. In this example, the outer if-else-endif looks at the value of the CT_SIXTYHZ counter, which above we saw always had the value 0 or 1. It has the value 0 when it’s time slot 1 and the value 1 when it’s time slot 4. So if the counter is zero, check on the 30 Hz counter and broadcast either the beam code 9 stuff or the beam code 8 stuff; else (the counter=1) broadcast the beam code 4 stuff.
After this comes the rest of the MGRPs with their if-else-endif statements involving counters, PNET_ARRAYs and modifiers. The files contain many, many MGRPs, which can make for an exceeding long, and many times confusing, file.
After you’ve become familiar with the parts of a TRANSL display, then the SOURCE displays/files aren’t quite as tricky.
A part of both the TERSE and the SOURCE displays that gets translated for the TRANSL display is the MACROs. These come between the PNET_ARRAYs and the MGRP_FIND. A typical macro looks like:
MACRO M_FIVEHZ
"IF (CT_FIVEHZ = 6) five_hertz ENDIF"
MACROs are used to define a set of if-then-else statements, PNET_ARRAY or modifier broadcasts that can then be represented by the name in any MGRP.
In this example, M_FIVEHZ can be used to represent the broadcast of the five_hertz modifier at (you guessed it) five Hz.
3.9 Configuration Files
3.9.1 General Information at a Glance
| File Type | CNF |
| Edit COM file | none |
| Reference directory | scratch: SCRCNF_PROD normal: SLCCNF_PROD templates: SLCCNF_COMMON |
| Compile Command | none |
| CMS protected? (Need MCCDEV?) | NO |
| References | Basic User's Guide, section 1.3.3 |
| Reference On-line | doc$bug:bug.doc |
3.9.2 General Information (Verbose)
Configuration files are used to save a certain machine configuration at a given time. These files save magnet settings, BPM readings, set point values, BGRP files, timing device settings, and analog status values, to name a few. When you save a config on the Config Index, the SCP uses a template to access certain values from the database, then saves the file, with an appropriate title and in the appropriate directory, and updates the index for that region. These files have type CNF and live in three main directories (that each contain more than 400 subdirectories). Normal configs are saved in subdirectories of SLCCNF_PROD; Scratch configs are saved in subdirectories of SCRCNF_PROD; and Config templates are saved in subdirectories of SLCCNF_COMMON. Each config region (like 02-24 magnets, or Linac feedback set points) has its own subdirectory of the above main directories.
For example, to get to the directory where 02-24 magnets are saved as normal you set default to SLCCNF_PROD, then set default [.02-24]. Here the configs are named: 02-24$###.CNF, where ### represents the config number from the config index display. Also within this directory is the index file (02?24DEX.CNF) and the history of the gold configuration file (02?24GLD_HST.CNF). It’s the same scene if you set default SCRCNF_PROD, then go to the 02-24 directory, except there is no gold config history file. The template file for the 02-24 magnet region lives in the 02-24 subdirectory of the SLCCNF_COMMON directory.
Hints for figuring out the name of the sub-directory:
There are 9 main categories of config files:
| If your region is for: | Then it's directory will start with: |
|---|---|
| BGRPs | BGRP |
| Magnets | the region name (like O2-24 or 25-bsy) |
| BPMs | BPM |
| Timing Devices | TIM |
| Analog Devices | ANA |
| Model | MODL |
| Klystrons | K |
| Feedbacks,/td> | FBK_ |
| Feedback Matrices | FBM |
3.10 MPS Algorithm Files
3.10.1 General Information at a Glance
| File Type | MPSL |
| Edit COM file | EDITMPS |
| Reference directory | REF_MPS_ALG_MPSL |
| Compile Command | MPSL |
| CMS protected? (Need MCCDEV?) | YES |
| CMS library name | CMS_MPS_ALG_MPSL |
| Reference On-line | [hvs.help]algchanges.hlp [hvs.help]ictrips.hlp doc$:[newsletter.old]mpsl_dbs_switch.news doc$:[newsletter.old]mpsl_dincs_switch.news doc$database:how_to_add_mps_module.mem doc$database:mps_rate_limit_inputs_to_mpg.doc And don’t forget all the great new MPS panel help |
3.10.2 General Information (Verbose)
MPS Algorithm files are used by the NewMPS. It uses the information contained in these files to see which devices it cares about and what it’s supposed to do if one changes state (trips or clears). These files have type MPSL and live in REF_MPS_ALG_MPSL. EDITMPS exists to help out with the tricky CMS stuff, but it also does all sorts of things that you might otherwise forget to do, including updating all the database files that drive the MPS fault accounting. If you type just EDITMPS, it will write some help to your screen about what to expect if you run it. In general, it’s recommended that you read Howard’s algchanges.hlp file before attempting anything (and potentially even running your changes by him, before changing anything).
Each AP (Algorithm Processor) has its own MPSL and MPSLINC (include) files. During the 1997 run, these had the names: APxx_1997.MPSL and APxx_1997.MPSLINC.
Please be aware that the MPSL files must work together with the BGRP. If you make major changes to one (MPS or BGRP), you might break the other.
3.10.3 Components of an MPSL File
The basic setup of the MPSL files is as follows:
An include file is included:
#include
This file has type MPSLINC and defines certain strings of characters (like LINAC_PIC_CABLE_OK) to represent certain devices with certain states. This makes it so there are no actual devices within the MPSL file.
Next, the AP and the name of the algorithm are defined:
AP = AP04
ALG = “AP04_1997”
Next the acceptable global modes are defined:
GLOBMMODE = “SLC”
Next, the relevant rate limiting area is defined:
BEAM = “LER_INJ”
What the MPS calls a “beam,” the MPG calls a “rate limiting area” or RLAREA. For each “beam”, typically four rates are defined: zerorate, limit_lo, limit_hi, and fullrate. Which rate it jumps to in the algorithm is the same rate that the machine was at the previous pulse. Thus if on the last machine pulse the machine was at limit_lo, then it would jump to
RATE = “LIMIT_LO”
Within each of these rate sections, if the stopper configuration (in or out) matches, i.e.
STOPCNF = LE_BYP_STOPPER_IN
then it will set the machine rate to zerorate, then try to work its way up through limit_lo and limit_hi to fullrate using the logic defined. For example:
NEWRATE = “ZERORATE”
LE_BYP_LDIM_OK &
LINAC_PIC_CABLE_OK
;
NEWRATE = “LIMIT_LO”
LINAC_PIC_LIMIT_LO_OK &
LE_BYP_PIC_LIMIT_LO_OK
;
NEWRATE = “LIMIT_HI”
;
The block:
LE_BYP_LDIM_OK &
LINAC_PIC_CABLE_OK
;
and the others like it are referred to as “assertions.” The AP evaluates the assertions. As long as the assertions evaluate to true, the AP continues. As soon as it finds a false assertion, it stops, and sends back the most recently determined “newrate.”
The above chunk of assertions might translate roughly as: if the previous machine pulse was at limit_lo (the rate command above) and the low energy bypass line stoppers are in, then set the new rate to be zero. Now, if both the low energy bypass LDIMs are OK and the LINAC PIC cables are OK, then set the new rate to be limit_lo. If the LINAC PICs and the low energy bypass line PICs pass the limit_lo test, then go to limit_hi.
As the machine can only go up one step (zerorate to limit_lo to limit_hi to fullrate) per machine pulse, this is where the algorithm stops within the chunk between “beam” definitions (ler_inj in the above example).
3.10.4 The Steps to Change a Device Definition
(This example assumes you’ll want to test compile before changing anything in CMS.) First, copy the current versions of the MPSL and MPSLINC files to your directory:
>COPY REF_MPS_ALG_MPSL:APxx_1997.* TEMP.*
This creates temp.mpsl and temp.mpslinc in the directory from which you typed the command. Now edit the MPSLINC file to match the new device definitions. Because the MPSL file includes the MPSLINC file, you’ll need to edit the MPSL file to tell it to look in your directory for the MPSLINC file. That is, change:
#include
to
#include
Now you can test compile your temp files with:
>MPSL TEMP.MPSL
If there are no errors, then go ahead and run editmps:
>EDITMPS APxx_1997
Once EDITMPS has done all the CMS replacing and compiling, then the new algorithm needs to be downloaded into the AP. This is done from the SCP (MPS/PPS PANEL to NEW MPS SYSTEM PANEL to AP CONTROL PANEL to the ALG PANEL). From this panel first select the AP you’re working with then hit download new algorithm to AP (“Downld NewAlg to AP”). And just like magic, you’re done.
3.10.5 Useful References
USER_DISK_SLC:[HVS.HELP]ALGCHANGES.HLP and ICTRIPS.HLP
In ALGCHANGES.HLP Howard has written up how to change MPSL files and what they do. He also has a nice Background section in that file. In the ICTRIPS.HLP file he goes into the PIC Processor trip settings.
DOC$:[NEWSLETTER.OLD]MPSL_DBS_SWITCH.NEWS and MPSL_DINCS_SWITCH.NEWS
In these two files, Kerry explains why the MPS Fault Accounting DBS files exists as well as the how and why they need to be updated every time a MPSL or MPSLINC file gets changed.
DOC$DATABASE:HOW_TO_ADD_MPS_MODULE.MEM
It’s doubtful that an operator will ever have to add a new MPS module, but within this, Ken explains really well the database structures associated with the new MPS. This is useful when adding a new device. Understanding all the database requirements for MPS devices is helpful toward understanding why the compiler is unhappy when the database isn’t set up perfectly.
DOC$DATABASE:MPS_RATE_LIMIT_INPUTS_TO_MPG.DOC
This is actually an e-mail from Glenn who did the research to figure out where the inputs to the MPG’s IDIM are coming from. Pretty cool. Good to know.
DOC$USER:MPSL_USERMAN
This is a user’s manual for the MPSL compiler that Greg wrote.
3.11 On-Line Glossary and other Library File examples
3.11.1 General Information at a Glance
| File Type | HLP and HLB |
| Edit COM file | SLCCOM:EDITGLOSSARY.COM |
| Reference directory | SLCHELP |
| Compile Command | none |
| CMS protected? (Need MCCDEV?) | NO |
| Reference On-line | >help library |
3.11.2 General Information (Verbose)
The SCP glossary is a module in a help library. It lives in the SLCHELP reference directory. The main help library is named: OPSHELP.HLB. The module name is GLOSSARY. There is a three step process to altering the glossary:
1. Extract the module from the reference library to your personal space:
>lib/extr=glossary/out=glossary slchelp:Opshelp.hlb
2. Edit the extracted module, updating it with your changes:
>eve glossary.hlp
3. Replace the module into the reference library
>lib/repl/help slchelp:Opshelp.hlb glossary.hlp
After doing this, you might want to delete the glossary.hlp still hanging around in your directory (because it’s 300 blocks).
>delete glossary.hlp;1
The format of the HLP file is very similar to the SCP help files. The main entry is preceded by a 1 (in this case GLOSSARY). A sub-entry of the main entry is preceded by a 2 (in this case the first letter of the glossary entry). A sub-entry of a sub-entry is preceded by a 3 (in this case the second letter of the glossary entry). Within a 3 section in DEC Alphabetical order are the entries starting with those first two letters.
3.11.3 The Library Command
The “lib” in the commands above calls the VMS Librarian Utility. More information about it can be found by typing help lib at a DCL prompt. The qualifiers listed below seem to be the most used:
/create Causes the creation of a new library
/extract=module Copies one or more modules from a library into a file
/help Indicates that the library specified is a help library
/list Creates a listing of the contents of the library
/object Indicates that the library specified is an object module library (meaning it contains OBJ files which are output after one compiles code)
/output=file When used with /extract, specifies the file specification of the output file
/replace Replaces one or more existing library modules with the modules specified in the input files (format: lib/repl library_name module_name)
/since, /before=time When used with /list, only lists those modules inserted before or after a particular time
3.11.4 CAMAC Crate Locations Example
The display that comes up when you press the CAMAC Crate Locations button on the Network Index is a module in the CAMDMP help library. The library lives in SLCHELP, and the module’s name is LOCATION. Same 3+ steps as above:
>lib/extr=location/out=location slchelp:camdmp.hlb
>eve location.hlp
>lib/repl/help slchelp:camdmp.hlb location.hlp
>delete location.hlp
This library also contains the camdmp information: what modules are in which crate and how their channels are assigned.
3.12 PEPII Diagnostic Lists
3.12.1 General Information at a Glance
| File Type | TXT |
| Edit COM file | none |
| Reference directory | dev_sys$root:[time] diaglist1.txt |
| Compile Command | none |
| CMS protected? (Need MCCDEV?) | NO |
| References | none |
3.12.2 General Information (Verbose)
PEPII Diagnostic Lists are flat files (just ASCII, nothing special) that contain a list of numbers separated by commas. They are used by the MPG to know what order in which to fill the buckets in PEP. They live in DEV_SYS$ROOT:[TIME]. There is no standard naming convention yet, but many of the files are not too hard to figure out by looking at their names. (For example, file B0.TXT fills only bucket zero.)
Once you’ve edited a file to your satisfaction, to tell the MPG to use it, from the PEPII DIAG LIST Panel (off the Beam Control Panel), press SET DG File Name and enter your file name at the prompt. Then hit EXECUTE DIAGLIST.
A program to create diagnostic lists exists in the DEV_SYS$ROOT:[TIME] directory called buckets. This prompts you for the start bucket number, the number of “macro” patterns, the pattern spacing, the number of buckets per pattern and the bucket space. It will list the array for you, then let you write the array to a file or type exit or quit to end.
This functionality is going to be replaced by the BIC at some point in the foreseeable future.