Hands On 1: Setting Up the Environment
Back to Agenda
In this first hands on you will learn:
- How to install Geant4 and some of the most common configuration options (OPTIONAL)
- How to compile an application against an installed version of Geant4
- How to run an application and interact with Geant4.
There is no exercise tar-ball for this first hands on
since we use Geant4 code base.
We are going to use Geant4 Version 10.4.p02 (Geant4 version numbers
are expressed with the triplet of numbers: Major.Minor.PatchLevel).
We are going to use a VirtualMachine with Geant4 pre-installed.
You do not
need to manually install Geant4, however we
review here some options and give some details on the installation process.
Geant4 code can be found in the download area on Geant4 website: http://www.geant4.org.
During the next days we will develop a Geant4 application that will
use the Geant4 installed libraries. Geant4 is a toolkit,
thus a Geant4 installation consists of a set of library files
and header files (plus resource files: the data-base data and
examples source code). You create an application compiled against a
Geant4 installation.
In the Hands On we will use the following conventions:
-
This font represents shell input/output,
C++ code or file names.
- The lines that start with the character
$ represents
commands that you have
to type in.
-
<tutorial> is the working directory,
replace this string with the appropriate full path.
-
Finally strings in parenthesis (
[ and ])
are optional.
If you are using the tutorial VM you do not need to install Geant4, however
you can follow the instructions here and install Geant4 a second time
just to familiarize with the process. If you are not interested, go directly
to the next exercise.
Code compilation dependencies
With its basic installation options Geant4 Version 10.4 does not
have external dependencies, but to configure the compilation and installation
process cmake is needed.
The role of cmake is to automatically create
Makfiles (or project files for IDEs) based on
options that can be modified.
We will show how to use cmake via command line options, but a
menu-based version of cmake exists (type ccmake instad of
cmake) and for some platforms also a GUI is avialble
(cmake-gui). Geant4 Version 10.4 requires cmake version at least 3.3.
Geant4 version 10.4 contains c++11
code, this mean that the compiler needs to support this standard.
With recent versions of Linux this is the default,
but you may need to manually install and setup a compiler in some cases.
Refer to the Geant4 installation guide
for additional information, including the list of supported compilers.
Visualization and GUI
We will also describe how to
setup and use the interactive graphical user interface (GUI) based on
Qt. This is an optional
component. We use Qt version 5.6 (Geant4 still supports Qt version 4).
Many Linux distributions already
have a pre-installed version of Qt. It is relatively easy to
manually install Qt on a Linux or Mac system, but we will not cover
this step in this tutorial. This component is optional, if
you do not want to use Qt simply skip the Qt options during
configuration. None of exercises require GUI interfaces to be completed.
If you do not have Qt or do not want to use it, the examples in
this tutorial will fall back to simple OpenGL graphics. In such a case
to enable OpenGL graphics, use
-DGEANT_USE_OPENGL_X11=ON when configuring G4 with
cmake. While for Linux this should not be a problem, it could
have issues on Mac systems. If this fail, contact us.
Multi-threading
Starting with Geant4 Version 10.0 we introduced event level parallelism via
multi-threading. This means that we will develop a parallel application
that will simulate events using all available cores of your machine.
This is an optional component: we will show here how to turn it
on, but if you do not want to enable MT you can still follow the exercises
as they are, since the code is also compatible with the sequential
version of Geant4. At this point multi-threading is not available for Windows users, sorry!
Note for virtual machine users: if you are using a VM,
even if you have a multi-core laptop it is possible that the
VM sees only one CPU core. It is usually just a matter of VM
configuration to allow more than one CPU in the guest OS.
Instructions: step-by-step installation guide
Step 0: Obtain the Geant4 code
After downloading and un-packing Geant4 tarball
(geant4.10.04.p02.tar.gz) in an empty working
directory, you need to
create a build directory where the compilation of Geant4 is
performed: cmake uses out of source builds.
Step 1: Configuration
In the following we assume you are using a Linux machine. For Mac users there
are little differences,
except that you will rely on the system compiler (clang) and cannot set an
alternative compiler (in an easy way).
Let's configure Geant4:
  $ cd <tutorial>

  $ wget http://cern.ch/geant4-data/releases/geant4.10.04.p02.tar.gz

  $ tar xf geant4.*.tar.gz

  $ ls

  geant4.10.04.p02 geant4.10.04.p02.tar.gz

  $ mkdir build

  $ cd build

  $ cmake -DCMAKE_INSTALL_PREFIX=<tutorial>
  -DGEANT4_BUILD_MULTITHREADED=ON -DGEANT4_INSTALL_DATA=ON -DGEANT4_USE_QT=ON
  -DGEANT4_USE_OPENGL_X11=ON ../geant4.10.04.p02
|
If you have an old version of Linux with a default compiler with a version <4.8.2,
type gcc --version to get the compiler version, you need to have installed
an alternative more recent compiler. For example if you have a CentOS 6 or Scientific Linux 6
distributions you need to manually install a recent compiler. After doing that you need
to prepend to the cmake line: CC=gcc CXX=g++ and make sure that
gcc and g++ binaries are the correct one.
Replace gcc and g++ with your alternative compiler if you have one
and you want to use it
(e.g. icc and icpc for Intel C compiler).
If everything goes as expected cmake will work
few seconds on the configuration. The last lines should read:
-- Configuring done

-- Generating done

-- Build files have been written to: <some-directory>/build
Some notes:
- If you do not want to use Qt, remove the
-DGEANT4_USE_QT=ON option. If you do not want
multi-threaded support remove also the corresponding option.
- If you disable Qt it is recommended to leave OpenGL with:
-DGEANT4_USE_OPENGL_X11=ON.
-
With Mac OS X you need XQuartz to be properly installed to use OPENGL_X11 option.
-
If you have installed Qt manually, and you are using Qt 5.6, you may need to
add:
-DCMAKE_PREFIX_PATH=<where-qt-is-installed>/5.6/gcc_64
to cmake options if Qt is not found (you may need to adjust the path).
- Refer to the installation
manual for a complete list of installation options. There are many more options available.
- If you already have installed Geant4 databases somewhere in your
system, you can avoid downloading automatically the library by adding
-DGEANT4_INSTALL_DATADIR=where-the-dbs-are.
- If you receive an error about
EXPAT libraries, add
-DGEANT4_USE_SYSTEM_EXPAT=OFF.
- If you want to use an already installed version of CLHEP,
instead of the Geant4 internal one, you can specify that via the option:
-DGEANT4_USE_SYSTEM_CLHEP=OFF. You may need to specify
where to find CLHEP (see installation manuals).
- If you want to use an IDE you can specify the
option
-G<ide-type-goes-here> (run cmake without options to see a list of
supported IDEs on your system, for example on Mac OS X with Xcode:
cmake -GXcode [...], for KDevelop3 support:
-GKDevelop3, for Eclipse: cmake -G"Eclipse CDT4 - Unix Makefiles" [...]. In such a case instead
of makefiles cmake will create project files for that IDE.
Step 2: Compilation
Compile Geant4, on a multi-core system with N cores you can
substantially speedup compilation with:
  $ #cd into <tutorial>/build if needed

  $ make -j N #or gmake -j N

  $ make install
|
Note: replace N with the integer representing the
number of cores of your machine. If not sure use 2.
Note: you can have a verbose compilation (for example to see the exact
compilation options) using make VERBOSE=1 -jN.
After Geant4 has been compiled and installed the content of the
<tutorial> directory should contain the directories: bin share include lib[64].
The include directory contains a sub-directory
(Geant4) where all the .hh files are
located. The directory lib[64] contains all Geant4
libraries and a sub-directory: Geant4-10.4.1, this
contains cmake files specific to Geant4 (they are used to compile an
application via cmake that uses Geant4).
Step 3: Setup runtime environment
Every time you want to use an application using Geant4
remember to (use the appropriate script extension depending on your
shell type, .sh for bash family, .csh for tcsh family):
$ source <tutorial>/bin/geant4.[c]sh
|
In the tutorial VM there are some environment variables that already point
to the installation location of Geant4:
-
$G4INSTALL Location of the installation directory.
-
$G4CMAKEDIR Location of the cmake sub-directory of the installation
-
$G4EXAMPLES Location of the examples source code
Check their values and familiarize with the environment.
Compile Example basic B1 provided with Geant4.
Example code can be found at:
$G4EXAMPLES/basic/B1. This is an
application that needs Geant4 libraries and headers to be compiled
correctly, thus you will need to instruct cmake to
use Geant4 from the location where it is installed.
Solution
  $ cd <tutorial>

  $ mkdir build-exB1

  $ cd build-exB1

  $ cmake -DGeant4_DIR=$G4CMAKEDIR $G4EXAMPLES/basic/B1

  $ make -jN

  $ ls

  ... some lines of output ...
|
Note 1 : If you get the line: [100%] Built target
exampleB1 everything worked as expected.
There is no need to make install; however if you want to install the
examples/exercises in an installation directory,
add -DCMAKE_INSTALL_PREFIX=<inst-dir> to cmake
line and type
make install after compilation.
Note 2: Warning, if you do not specify
-DCMAKE_INSTALL_PREFIX cmake will install under (on
linux) /usr/local, and you do not have permissions
to modify that directory.
Note 3:
If the configuration step (the cmake command) continuously fails with
cryptic error messages, try to remove the content of
build-exB1 directory and try again since corrupted files may be
around.
Start the application from the previous exercise. For this very
first test, we disable Qt interface.
Geant4 will initialize and will greet you with some output, the
first lines should read:
 *************************************************************

   Geant4 version Name: geant4-10-04-patch-01 [MT]   (2-March-2018)

   << in Multi-threaded mode >>

                       Copyright : Geant4 Collaboration

                       Reference : NIM A 506 (2003), 250-303

                             WWW : http://cern.ch/geant4

 *************************************************************
|
Note: G4 can be quite verbose, especially if you have enabled MT
support. You can double check your terminal setup to be sure it
buffers enough lines of text (~1000 lines buffer should be enough).
If you receive error messages like ERROR:
G4VisCommandsViewerSet::SetNewValue: no current viewer you can
safely ignore them.
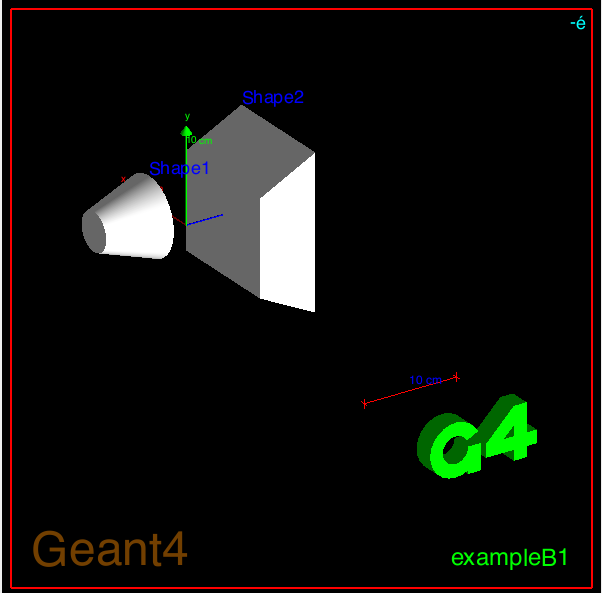
A visualization window will appear with the geometry
displayed (if you have OpenGL support compiled with G4):
You will see Geant4 prompt, you can issue Geant4 commands. When using Qt GUI
the prompt is replaced by the Session: input box.
For example:
You can now input new commands to Geant4
prompt:
Session: help

Session: exit
|
Refer to the presentations at this tutorial for UI interactivity.
Take your time to familiarize with the Geant4 prompt (for example note
that the prompt has auto-complete, the tab key; history, with
up-down arrow keys).
Try navigating the GUI help panel.
Familiarize with the help menu and its sub-menu levels. Can you
find where the /run/beamOn command is located? What is
the UI command to change the primary particle type?
Qt graphic windows will
be embedded in the GUI. Play with the interface, in particular take a
look at the help menu.

Compile a second exercise.
Browse the $G4EXAMPLES directory and try
out compilation of few
examples.
Compile them following the instructions of the previous exercise.
Note: It is good practice to compile every example in a
separate empty directory. Remember that Geant4 requires
out-of-source builds, you cannot compile in the same directory
where the source code lives.
Imprtant: some exercises may
require additional components of Geant4 (e.g. GDML), thus may not
compile in this setup.
Tutorial by:
Andrea Dotti (adotti AT slac DOT stanford DOT edu)
May 2018