This pages describes the general concepts of the data acquisition (DAQ) software
written for the cosmic ray telescope (CRT).
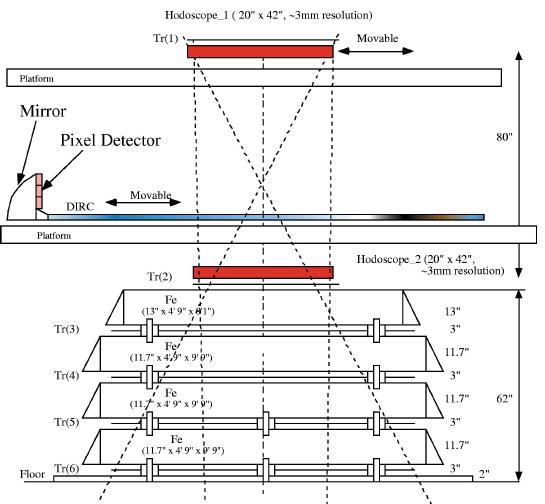
The major aim of the CRT is to serve as a facility to test high energy
detector components, such as trackers or Cherenkov counters. The CRT is
designed to measure muons coming from the cosmic ray background and to detect
their path of flight. It will have a sufficient precision to check the
performance of a test device.
The setup, including a test device, looks as follows:
The detectors are read-out by CAMAC crate electronics. The current list of
hardware included in the readout part of the setup is:
For PMT scanning, we use the following hardware, which should be supported
by the same readout software:
For tests we also have the following hardware, which should be supported
by the same readout software:
In the following we will talk about two different hardware components. On the one hand side, there is the individual board that performs some measurement. On the other hand side, we connect these boards by a bus and a bus controller, we will call these two elements a crate. Please note that this naming convention is differs from the common naming conventions for the different systems. For the three systems we use, our names will mean:
As you can see, the KineticSystems 3388 GPIB board is a board in the CAMAC setup but functions as a crate in the GPIB setup.
The readout software has been developed in C++. The main concept is a
shell model using the following levels :
Low level driver for the hardware in the PC
The low level drivers are taken from either the producing companies or other projects. We use the following packages:
Mid level driver unifying the interface to the low level drivers
The mid level drivers allow for setuping up a configuration in C++ and, thus, interface the low level routines to a common C++ interface. The interface offers access to all features of each board.
The chosen framework ROOT allows to have interactive access to the boards and crates.
For each board you can clear, test, enable, and disable features; read and write some registers; and send specific commands. The features available to a board are defined in the class headers and in the comments to the class functions. See the Class Reference for detailed information.
Generic drivers for different tasks
Several different boards fulfill the same task but have different features and identical features are used differently.
As an example, one can look at TDCs. Three implemented TDCs, LeCroy 2228A, LeCroy 2277, and Phillips 7186, have the same task, digitization of time differences. The individual features that make the read-out different for each of them are summarized in the following table:
| LeCroy 2228A | Phillips 7186 | LeCroy 2277 | |
|---|---|---|---|
| No. of channels | 8 | 16 | 32 |
| Bit per channel | 11 | 12 | 16 |
| Layout of data | 11 bit data | 12 bit data, then 5 bit channel no | 16 bit data, one bit edge polarity, 4 bit channel no |
| Read out method | read(channelno) (1) | read(channelno) (1) or read_sparse(0) (2) | read(0) (3) |
Notes:
In order to make the interface for the users as easy as possible, the generic drivers implement a generic interface providing the following routines to the user for each TDC (and for the ADC as well):
These routines allow you to read-out any TDC without knowing any details about the lower levels.
Please note, the generic driver does no longer offer you all the features the board offers. E.g. for the Phillips 7186 TDC, you can define thresholds and pedestals, this is only possible with the lower level functions.
The current existing generic interfaces are:
See the Class Reference for detailed information.
In general we use the Taligent naming and coding conventions as applied in the ROOT framework.
In addition, we replace the T prefix for classes by a Crt prefix the CosmicRayTelescope classes so that we can easily distinguish them.
All source and header files should include CPP code to prevent multiple including in the following way:
    #ifndef __CLASSNAME_CXX
    #define __CLASSNAME_CXX
    [... code ...]
    #endif
with CLASSNAME replaced by the all upper-case class name and the a HH instead of the CXX for headers.
Files for compilation should be named .cc and .hh according to the BaBar coding rules. Macros should have the .C suffix to mark them as macros.
Getting and compiling the driver code
For both methods you will need the libraries for the low level and mid level/generic drivers. These are not available in precompiled format but have to be created by checking out the sources from the CVS repository.
To check out the sources the first time use:
CVSROOT=/afs/slac.stanford.edu/u/br/hadig/babar/CVSROOT/ cvs co CosmicRayTelescope
this will create a new directory called CosmicRayTelescope in the current directory and checks out all the source files of the project. Please change your working directory to this for all following commands.
     cd CosmicRayTelescope
     pwd
It is convenient to set an environment variable CRT to the value returned by the pwd command in your startup files. In addition, we need the ROOTSYS variable to be set to:
/afs/slac.stanford.edu/g/babar/package/root/3.00-06/Linux2
for SLAC RedHat 6.2 systems and for SLAC RedHat 7.2/7.3 systems to:
/afs/slac.stanford.edu/g/babar/package/root/3.00-06/Linux2-gcc-2.95.2
(please note that BaBar uses a different, older version of ROOT and that this version is available on RedHat 6.2 systems only, such as kosmic)
Type: echo $SHELL. If the output ends with csh, add the line setenv CRT output_of_pwd_command to your ~/.login or ~/.cshrc file. Otherwise add the lines CRT=output_of_pwd_command and export CRT to you ~/.profile file.
To get the newest version of the package run the command
cvs update -A
More information about CVS can be found by reading the manual (info cvs) or by locking at the resources referenced on the BaBar CVS page. Please note that only the commands starting with cvs can be used. The SRT tools (addpkg, newrel, etc.) are not applicable.
Compile the code for the low level and mid level/generic drivers by running the following commands:
     gmake clean
     gmake depend
     gmake drivers
     gmake
Writing own code
There are three possibilities:
We will start explaining the use of the first possibility:
Working interactively in ROOT
Start ROOT:
$ROOTSYS/bin/root
In order to use the classes in ROOT, you have to load the libraries at the ROOT prompt:
    gSystem->Load("$CRT/lib/libnigpib.so");
    gSystem->Load("$CRT/lib/libsjy.so");
    gSystem->Load("$CRT/lib/libgendriver.so");
Now you can define your setup, i.e. crate the crate objects and the board objects. In the following, we assume you are running ROOT on kosmic, the computer at the Cosmic Ray Telescope.
    CrtCamacCrate *crate1 = new CrtCamacCrate("crate1",1,1,1);
    crate1->Initialize();
    crate1->SetInhibit();
    CrtCamacCrate *crate2 = new CrtCamacCrate("crate2",1,2,1);
    crate2->Initialize();
    crate2->SetInhibit();
Here we opened two CAMAC crates, both a SCSI bus 1 with SCSI ID 1 and ID 2. We initialize both and inhibit the data taking in order to prepare all boards for data taking before the first data are recorded in already initialized boards.
The next task is to create and init the board objects.
    CrtTdc2228ABoard *tdc = new CrtTdc2228ABoard("tdc1",19,crate2);
    tdc->Initialize();
    tdc->Prepare();
    CrtAdc2249ABoard *adc1 = new CrtAdc2249ABoard("adc1",11,crate2);
    adc1->Initialize();
    adc1->Prepare();
    CrtAdc2249ABoard *adc2 = new CrtAdc2249ABoard("adc2",21,crate1);
    adc2->Initialize();
    adc2->Prepare();
This creates a TDC board object for a TDC 2228A board in slot 19 of the CAMAC crate with the SCSI ID 2 and two ADC board objects for a ADC 2249A board in slot 11 of the same and a board in slot 21 of the other CAMAC crate.
This finishes the preparation and we can start to take data. The TDC has eight channels, the ADC has 12, so we need arrays to store the data. To take data, we have to remove the crate inhibits and wait for data.
    Int_t tdcdata[12]; // a bit too long ... but too long does not matter
    tdcdata[8]=-1;  // fill unused array elements
    tdcdata[9]=-1;
    tdcdata[10]=-1;
    tdcdata[11]=-1;
    Int_t adcdata1[12];
    Int_t adcdata2[12];
    crate1->ClearInhibit();
    crate2->ClearInhibit();
    Int_t ret = adc1->WaitForData(10);  // approx 10sec timeout
    crate1->SetInhibit();
    crate2->SetInhibit();
    cout<<"Return value : "<<ret<<endl;
Once that arrives, we inhibit the crate and read and print the data.
    cout<<"The ADC #1 has "<<(adc1->HasData() ? "" : "NO ")<<"data !"<<endl;
    adc1->ReadModuleAndClear(adcdata1);
    cout<<"The ADC #2 has "<<(adc2->HasData() ? "" : "NO ")<<"data !"<<endl;
    adc2->ReadModuleAndClear(adcdata2);
    cout<<"The TDC has "<<(tdc->HasData() ? "" : "NO ")<<"data !"<<endl;
    tdc->ReadModuleAndClear(tdcdata);
    Int_t i=0;
    cout<<"               ADC#1       ADC#2      TDC"<<endl;
    while(i<12) { cout<<"Ch#"<<i<<": "<<adcdata1[i]<<", "<<adcdata2[i] <<", "<<tdcdata[i++]<<endl; }
You can leave ROOT by typing:
.q
Writing a ROOT macro
This relatively simple now. Simply put all the lines (starting with gSystem... till the while... line) in a text file called example.C and put a opening curly bracket before and a closing curly bracket after the text. Start ROOT and execute:
.x example.C
This will run all the lines exactly once.
A more interesting version is to add the line
example()
(the name has to be the name of the file without the .C ending) at the top of the file (including the curly brackets mentioned before). Now you can type:
    .L example.C
    example()
    example()
The .L command defines the function example and therefore you can run the function by calling example() in the interpreter.
Writing an executable program
In principle the code run in the interpreter can be compiled directly. However, there are a few additional things to consider:
Startup code
You have to take care of three things that ROOT normally does for you:
#include <TROOT.h>
for each class, e.g. TROOT in this case.
For the generic drivers add e.g. for CrtTdc2228ABoard
#include <gendriver/tdc2228Aboard.hh>
In addition, you might need to include
#include <iostream.h>
if you make printout.
       int main(int argc, char **argv)
        {
TROOT prog("gpibTest","a simple example program");
         return 0;
        }
CINT specifics
There are a few features of CINT that are not allowed by the C++ language standard. I recommend not to use those as they confuse you when you convert an interpreted code to a compiled code.
Compiling/Linking the executable
To compile you will have to add the flags to make the directories known that contain the include files. Add
-Wall -I$CRT -I$ROOTSYS/include
to your compilation command. In order to link the executable, you have to include the three libraries of the CRT package and the ROOT libraries. The CRT libraries are:
-L$CRT/lib -lsjy -lnigpib -lgendriver
For the ROOT libraries simply include the output of the command
$ROOTSYS/bin/root-config --libs
or, if you make use of the graphical features of ROOT:
$ROOTSYS/bin/root-config --glibs
It is also recommended that you add the option:
-Wl,-rpath,$CRT/lib:$ROOTSYS/lib
as this saves you from setting the LD_LIBRARY_PATH variable each time you call the executable.
Please see the Makefile in the examples directory for more information.
Calling an interactive session at the end of the compiled code
It is nice to call an interactive ROOT session at the end of the compiled code. This allows you to continue to develop the code in an interactive session while doing the startup in compiled code.
In order to do this, add the following lines directly after the TROOT initialization in order to instantiate and initialize the interpreter.
    char *myargv[] = { "analyse" };
    int  myargc = 1;
    TRint appl("appl", &myargc, myargv, 0,0);
Whenever you reach a point where you would like to start the interpreter, call:
appl.Run(kTRUE);
This call will return only after the user typed .q in the interpreter. After that you can continue with your executable code.
It might be necessary for the interactive user to use the variables initialized in the executable part. This is handled by the class code. The variable name the user can use to access a class is the name given in the constructor, i.e. e.g. crate1 in above example.
Web Page by Thomas Hadig