Build and Run Gleam w. MRvcmt (Desktop Machine)
This procedure details how to use MRvcmt to: checkout the source code for a full GlastRelease; build Gleam; run both the test_Gleam and Gleam applications, view the event outputs in FRED, and then create and run an optional Gleam jobOptions.txt file, all on your local machine.
| Notice: The GLAST code has not been released to the public and is for use by members of the LAT Collaboration only! |
Note: Example Commands and Responses assume the Windows platform. On Linux, delimiters within file paths should, as usual, be forward slashes (/).
Troubleshooting Tip - Developers: If you used the installer to checkout a software release and are now modifying a package with the intent of doing a build and checking it back in using MRvcmt, you may find CVS requires you to enter your password before you can check it in. This is because your packages were downloaded with a different CVSROOT setting (i.e., without a username). You will either have to do a fresh checkout with your current setting, or you have to go through all of the */CVS/Root files and add your username to them. To avoid this problem, it is recommended that packages you intend to change be checked out individually using MRvcmt and placed in a special work directory.
Prerequisites
- MRvcmt is installed
- FRED is installed
Part I. Obtain Source Code
To use MRvcmt to obtain source code:
- Check the Release Manager (RM) and determine which version of code that you want
(e.g., GlastRelease v7r2).Note: If you are not located at SLAC, it may be significantly faster to download the code you want from the RM's Summary Page for the desired version. (See Release Manager: Builds, Accessing Checkout Packages and Builds.)
- Using the Installer, verify that you have the all of the external libraries required for that release -- and the correct versions of those libraries -- installed in c:\glast\extlib (and to obtain them if you don't).
Note: The Installer enables you to obtain any tagged release build, as well as any Head or Latest build. You can also obtain individual package(s) 05/22/2008Rvcmt to checkout individual packages, and the Installer to checkout a build that you intend to test against, together with the external libraries required for that build.
In this example, however, we are using MRvcmt to checkout a release and the Installer to verify that we have the necessary external libraries (and obtain them if necessary).
To verify that you have all of the external libraries required for the build you are interested in, click on Launch Installer, then:
- Select the top-level package (e.g., GlastRelease) you are interested in.
- Select the appropriate Version and Tag.
- Select the appropriate External packages folder.
- Deselect (i.e., Clear All) all of the Glast Files in that release.
Note: You may have to select a Destination folder before proceeding to the next step; however, as noted in the following step, you will not download any files to the Destination folder.
- Click on the External tab.
- Click the Install button to install the missing libraries.
The Installer automatically checks the libraries installed on your machine and, by default, identifies any additional libraries needed.
- Create the directory where you want to install the source code
(e.g., c:\glast\packages\GR-v7r2).
- Launch MRvcmt and select:
Options --> Cmt Options
The cmt options GUI will be displayed.
- Refer as necessary to Setting up MRvcmt Options, and set the first Cmt Options path so that it points to the directory you just created.
Note: Again referring to Setting up MRvcmt Options, be sure the second path is defined correctly, and that the full path to your CMT executable is displayed in green:

- From the MRvcmt GUI, select:
Packages --> Checkout
The Checkout GUI will be displayed.
- Enter the Name of the package you want to checkout (e.g., GlastRelease).
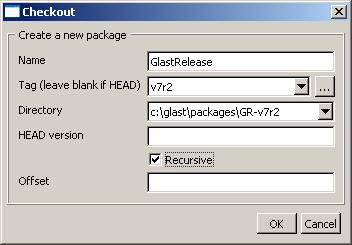
- Enter the Tag (e.g., v7r2).
- Check
 , then click the OK button.
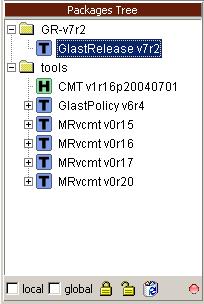
 - In the Packages Tree, click on GlastRelease v7r2.
Tip: If you click on the
button, a list of valid tags from the CVS repository will be built and available to you from the dropdown menu to the left of the button.
Tip: At the time of this writing, MRvcmt crashed after downloading the GlastRelease and GlastPolicy folders into the target directory (GR-v7r2). If this should happen, restart MRvcmt and proceed as follows:
- Click on the
 Add button.
Follow the progress of the checkout under MRvcmt's 'output' tab.
When checkout is complete, all packages will be displayed in the Packages Tree, and the
message will be displayed in the status bar.
Tips:
- To highlight error messages in the output display, right click on the output page and select: highlight errors

- To clear the output display, right click on the page and select: clear all
Part II. Build the Package
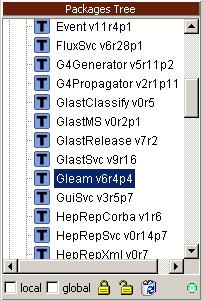
- In the Packages Tree, select Gleam.
Note: The green light should be lit.
- Select local broadcast:
Note: If all of the dependent packages are in the same directory, you should check local broadcast; if they are in different directories, you should check global broadcast.
- Click on the
 Config icon to launch cmt config on the package.
Follow the progress of config under MRvcmt's 'output' tab. When it completes, the
Notes:
- You can now run builds (i.e., "make") on your machine.
- In the future (i.e., after you have completed this exercise) when checking out a single package that you are working with:
- Create a new "work" directory for the package, create a new CMT Path to that directory, and then checkout your package. (Refer as necessary to Setting up MRvcmt Options, and set the first Cmt Options path so that it points to the directory you just created.)
- When you "make" a new package, MRvcmt will - by default - try to rebuild all of the packages unless you set the "read-only" bit for the entire build, including all subdirectories.
If you are a Windows user: right-click on the top directory; select Properties; select Read-only; click on the Advanced button; and select Apply changes to this folder, subfolders, and files.
Tip (for Windows users): After clicking on the "Read-only" and "Apply changes to ..." boxes, click outside each of the boxes a couple of times to ensure there's a check mark in each box.
To continue with this exercise and build Gleam:
- Again select local broadcast:
- Then, with the package (e.g., Gleam) still highlighted, click on the
 Make icon to launch make on the package.
After a short delay,
is displayed in the Status bar, and you will be able to follow the progress of the operation under the output tab.
Note: This is a rather lengthy process, and you should allow up to 90 minutes for this operation to complete for the VC8debug checkout version. Most of this time is consumed by the Merit ntuple. (The optimized version should build considerably faster.)
When the Gleam build has completed, the
Results are summarized at the bottom of the BuildLog page, and should be similar to:
Build log was saved at
"file://c:\glast\packages\GR-v7r2\Gleam\v6r4p4\VC8debug\Gleam\BuildLog.htm"
Gleam - 0 error(s), 1 warning(s)
Part III. Run the Applications
test_Gleam
- Choose the directory of execution:
- Click on the ...button immediately to the right of the red "Run selected application ..." button .
The following GUI will appear:
- In the data entry field, enter the path to your work directory (or to a directory where you have write access), e.g., c:\glast\testMRvcmt\cpWork.
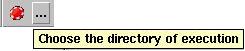
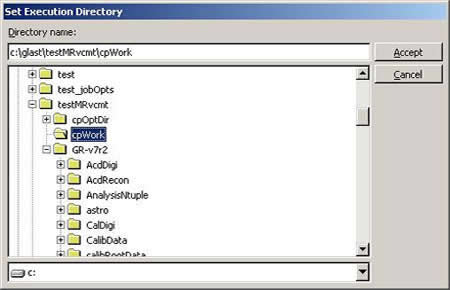
Then click on the Accept button.
- From the list of constituent packages, select the application you wish to run (e.g., test_Gleam).

- Click on the red Run application button
You can follow the test progress in the shell window.
When test_Gleam has completed, the
Results are summarized at the bottom of the BuildLog page, and should be similar to:
Build log was saved at
"file://c:\glast\testMRvcmt\GR-v7r2\Gleam\v6r4p4\VC8debug\test_Gleam\BuildLog.htm" test_Gleam
- 0 error(s), 1 warning(s)
Run Gleam
- Be sure that the Gleam package is still highlighted in the Packages Tree and, from the list of constituent packages, select the Gleam application:
Tip: You can override an application's jobOptions file, by entering the path to your own jobOptions file in the data entry field on the right. (See Create and Run Your Own Gleam jobOptions.txt File.)
- Click on the red Run application button.
When complete, FRED will launch automatically, and the Corba .ior file will be loaded automatically.

- Click on the
 Next Event button to view the first event.
- Click on the Next Event button again to view the next event:
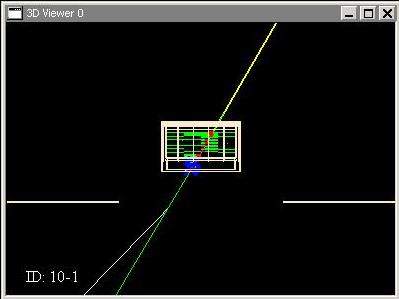
Notes:
- Observe that the ID number in the lower left increments by one each time you click on the Next Event button.
- Refer to the FRED Tutorial to explore additional functions of the viewer.
- Continue to view events. When you are finished:
- Click on the FRED
Stop button.
- To quit FRED, select:
Main --> Quit
Tip: Or use the shortcut: Ctrl-Q
To quit MRvcmt, click on the red
Create and Run Your Own Gleam jobOptions.txt File
To create and run a new Gleam jobOptions.txt file:
- First copy the jobOptions.txt file from the builds directory to your working directory.
Note: In this example, the jobOptions.txt file is in:
C:\glast\testMRvcmt\GR-v7r2\Gleam\v6r4p4\src\jobOptions.txt
- Refer to Gleam JobOptions Files and edit your copy of the jobOptions.txt file.
- Save the file in your work directory and name it gleam_jobOptions.txt.
- In the "Optional parameters for the executable " field, enter the full path to the
new gleam_ jobOptions.txt file; for example:
C:\glast\testMRvcmt\cpWork\gleam_jobOptions.txt
- Be sure that the Gleam package is still highlighted in the Packages Tree, and select Gleam from the list of constituent packages.
- Click on the red Run application button.
You can follow Gleam's progress in the shell window. When it completes, FRED will launch automatically, and the Corba .ior file will be loaded automatically.
- Click on the Next Event button to view the first event.
- Continue to view events. When you are finished:
- Click on the FRED
- To quit FRED, select:
Main --> Quit
Tip: Or use the shortcut: Ctrl-Q
To quit MRvcmt, click on the red
| Last updated by: Chuck Patterson 05/22/2006 |