Interaction Region CAD File Management
IR Note 960410-R0
Written: Martin Nordby
Date: 10 April 96
1. CAD File Management
Since many of the sub-systems in the IR see near-continuous change, and impact many other sub-systems, layout files need to be shared among many designers and engineers, and translated out to iges or dxf files for use with other CAD systems. With so much data coming and going from and to the CAD files, it becomes critical that the quality and reliability of the file is not compromised. In other words, we need to be confident that the files we use contain correct information, in a format which cannot be misinterpreted.
To facilitate this, the IR Group has developed the following protocols
to help ensure that the general layout files used for the IR remain
"trustworthy."
2. Master File Library
For many of the IR systems, the design of the system must be developed using reference files of neighboring components. This ensures the tight integration of all the sub-systems. However, with many people working on many sub-systems, it becomes difficult to guarantee that all reference files are up-to-date, and contain the latest information.
The Master File Library attempts to solve this problem. This directory contains one file for each of the "key" sub-systems, as well as standard assembly files which reference these sub-system files. This library is managed by Joe Stieber and Catherine Carr, and files are "checked in" by them. These files can then be attached from their Library directory as reference files, into working files on your local directory. Thus, if the reference file is modified, the changes will be automatically updated in your working file the next time it is entered. Furthermore, as files in this directory are updated, old revisions will be kept in an archive directory, so they can be accessed, if needed.
The directory for IR files resides on /u3/ir/ on caddoc1. There are sub-directories for each logical group of files, and in each sub-directory are three directories: "incoming," "master," and "obsolete." The "master" directory contains the "official" versions of files, and should only be modified by Catherine or Joe. If a file is to be modified, it should be copied out of this directory. Once the modifications are made (and/or a good stopping point is reached), the file should be put in the "incoming" directory, and Joe or Catherine contacted. They will check the file and put it in the "master" directory, and remove the old revision. This ensures that the "master" directory stays cleaned up, without duplicate files, or files with obsolete information.
Finally, when attaching a "master file" as a reference
file, do NOT copy it onto your local directory, but refer to its
global path name (e.g.: /u3/ir/vacuum/master/b1cham.ems). This
ensures that the actual master file is being referenced, and not
a copy which will become obsolete.
3. Layout File Standardization
The Interaction Region of PEP-II is very congested, and contains some of the most technically difficult magnets, vacuum components, and support system in the entire machine. To respond to these challenges, all layout modeling of the IR-2 region and the BaBar detector uses the full 3-D capability of the CAD systems used.
Since many of the sub-systems in the IR see near-continuous change,
and impact many other sub-systems, layout files can be shared
among many designers and engineers, and translated for use with
other CAD systems. Therefore, layout files should contain the
following standard information and reference frames.
3.1 File Naming
Prior to assigning a drawing number to a file, the file name for all master files should describe the part or sub-assembly being modeled, and should be understandable to others (i.e.: avoid obscure personal naming conventions). For files on local directories, anything goes, but name standardization for master files will make them much more useable.
Furthermore, when a file is modified, the name must not be changed.
However, the suffix revision level should be increased by a number
(e.g.: q1magnet.e0 becomes q1magnet.e1). This revision number
is stripped when it is put into the master directory, so all files
calling this as a reference file will be updated automatically.
3.2 Coordinate Systems
All model information in a file should be correctly located in
all six degrees of freedom with respect to the "IR Reference
Frame." This coordinate system is defined as follows:
IR Reference Frame Axes
(0,0,0) = The interaction point
+Z-axis: Pointing in the direction of the H.E.B., and parallel to the PEP Control Line.
+X-axis: Radially outward from the center of the PEP-II ring.
+Y-axis: Up
In the Intergraph CAD world, the views should be changed such that the Base Coordinate System is oriented correctly to this IR Reference Frame. Note that this is NOT square to the Detector Coordinate System, but IS square to the building and PEP-II tunnels.
If model graphics cannot be modified to correctly locate it, the model file standard view (used for reference file attachment) must be correctly rotated and offset from the view origin to ensure that the file can be brought into another file using this view, with the model information correctly aligned (see below).
Furthermore, all CAD files and all printouts, should include the
IR Reference Frame Coordinate System in the view, so the orientation
and dimensions are correctly interpreted.
3.3 Views
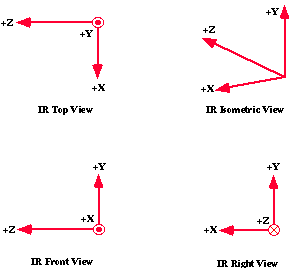
Since the IR Reference Frame orientation does not match the default
orientation of the Intergraph CAD environment, new views have
been developed: irtop, irright, irfront,
and iriso. These rotate the "camera angle" to
produce standard view orientations, but using the IR Reference
Frame definitions. The standard views for the IR are:

irtop: Looking in -Y, with +Z to the left, and +X down.
irfront: Looking in -X, with +Z to the left, and +Y up.
irright: Looking in +Z, with +X to the right, and +Y up.
iriso: +Z up to the left, +X down to the left, +Y up.
To facilitate exchanging files, and using reference files, the
"irtop" view must be defined using the "Save View"
command, such that the model is correctly located in the view
(including rotation), with the view center being the I.P. This
ensures that the file can be referenced into any other IR file,
using the "irtop" view, and placed at (0,0,0), and the
model information is automatically located.
3.4 File Documentation
Since files are often modified, typically using new information from any number of sources, it is difficult to keep track of what information led to which modification. To minimize this confusion, the Intergraph Notebook feature should be used to document any changes made to a file. This should serve as a running log of changes, with all entries dated and initialed, and as much back-up documentation referenced as possible.
Example: A change in the Q2 Magnet position has caused a change
in the Beam Stay-Clears (BSC's). The new BSC's are entered into
the BSC file, and the Notebook updated to include the Magbends
run number and date which generated the BSC's.
4. File Hardcopies and Dimensioning
All printouts and hardcopies should include the following information:
Dimensions: when dimensions are shown, there should be a note explaining which coordinate system is being used. Ideally, dimensions should be with respect to the IR Reference Frame.
Date: in lieu of an official revision number, the date is the best/only way to track down the information used to generate a picture.
Format: either use a format, or put down the information contained
in the format block: name, scale, and drawing title.
For 3-D model files, adding this information to a drawing before printing involves extra work, but this is becoming more important to do as more people become involved in the Interaction Region, most of whom do not have access to a CAD system, or do not know the history of the CAD file.